Are you looking to add a warm, handmade touch to your holiday decorations this year? Imagine a charming painted snowman on wood that brings a cozy, festive feel to your home.
Creating this DIY Christmas decoration is easier than you think, and it’s a fun way to showcase your creativity. In this post, you’ll discover simple steps to craft your own painted snowman that will brighten up any room and impress your guests.
Ready to make your holiday decor truly special? Let’s get started!
Materials Needed
Creating a painted snowman on wood is a fun and simple DIY project. Gathering the right materials makes the process smooth and enjoyable. This section lists all the essentials you need to start your Christmas decoration.
Wood Selection
Choose a smooth wooden board or plank for your snowman. Pine, cedar, or plywood works well. Make sure the wood is dry and free of cracks. A flat surface helps paint stick better. Cut the wood into your desired snowman shape before painting.
Paint Types
Use acrylic paint for bright and lasting colors. These paints dry fast and are easy to work with. White, black, orange, and red are basic colors for snowman details. You can also use spray paint as a base coat for quicker coverage.
Additional Supplies
Gather paintbrushes in various sizes for detail and filling large areas. Use sandpaper to smooth the wood surface before painting. A pencil helps sketch the snowman outline. Clear sealant spray protects your finished decoration from damage.

Preparing The Wood
Preparing the wood is the first step in creating a beautiful painted snowman decoration. This process helps the wood look smooth and ready for paint. Taking time to prepare the wood ensures your decoration lasts longer and looks great.
Start with the right wood and tools. Then carefully shape and smooth the surface. This will make your snowman more detailed and neat.
Cutting The Shape
Choose a piece of wood that fits your snowman design. Use a pencil to draw the snowman outline clearly. A jigsaw or scroll saw works best for cutting curves. Cut slowly and follow the lines to get a clean shape. Keep safety in mind by wearing goggles and gloves.
Sanding And Smoothing
After cutting, the edges may feel rough. Use sandpaper to smooth all surfaces. Start with medium-grit paper and finish with fine-grit for a soft touch. Sand corners gently to avoid sharp edges. Smooth wood helps paint stick better and look even.
Designing The Snowman
Designing the snowman is the first fun step in this Christmas craft. It sets the look and feel of your wooden decoration. A good design helps the snowman stand out on your mantel or door.
Keep the design simple and clear. This makes painting easier and the final product more charming. Think about the snowman’s shape, face, and accessories before you start.
Sketching The Outline
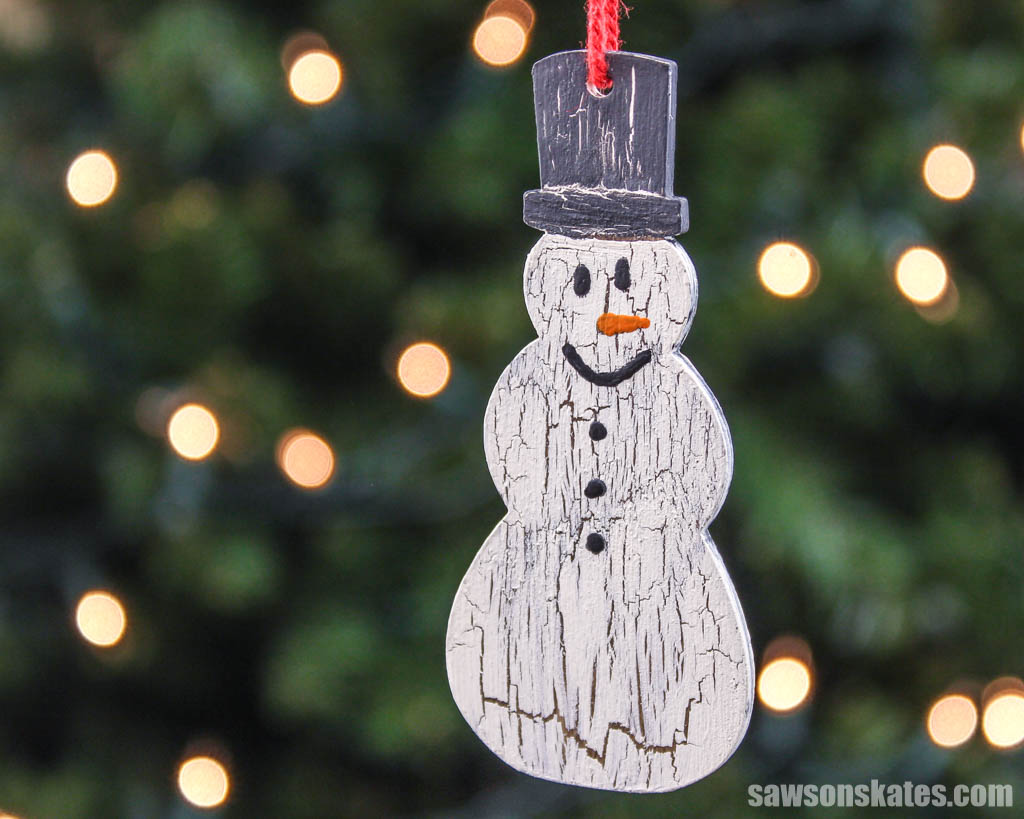
Start by drawing a light outline on the wood. Use a pencil so you can erase mistakes. Sketch three round shapes for the body and head. Add a hat, scarf, and buttons to bring character. Keep lines smooth and easy to follow. This outline guides your painting and keeps shapes neat.
Choosing Colors
Pick colors that fit the Christmas spirit. White for the snowman’s body is classic. Use black or dark colors for eyes, mouth, and buttons. Bright red or green works well for scarves and hats. Choose colors that contrast the wood background. This makes your snowman pop and look festive.

Painting Techniques
Painting a wooden snowman brings your Christmas decoration to life. The right painting techniques help create a charming and festive look. Simple steps guide you through making your snowman colorful and detailed. Follow these painting tips for a smooth and fun craft experience.
Base Coating
Start with a clean, smooth wood surface. Apply a white or light-colored base coat. This layer helps paint stick better and shows true colors. Use a wide brush for even coverage. Let the base coat dry completely before the next step.
Adding Details
Use small brushes to paint the snowman’s face and buttons. Add eyes, nose, and a smile with careful strokes. Paint the hat, scarf, and arms with bright colors. Take your time to make details neat and clear. Details bring personality to your snowman decoration.
Layering And Shading
Apply a second layer of paint to deepen colors. Use a darker shade for shadows and edges. This adds depth and makes the snowman look real. Blend colors softly to avoid harsh lines. Layering creates a rich and textured finish.
Adding Finishing Touches
Adding finishing touches to your painted snowman on wood brings the project to life. These steps protect your work and prepare it for display. Small details make a big difference in the final look.
Sealing The Paint
Sealing protects the paint from scratches and moisture. Use a clear acrylic sealer for best results. Spray or brush it on in thin, even coats. Let each coat dry completely before adding the next. This step helps keep colors bright and fresh. Sealing also adds a nice shine or matte finish, depending on your choice.
Attaching Hanging Hardware
Choose the right hardware to hang your decoration safely. Small screw eyes or sawtooth hangers work well on wood. Attach the hardware at the top center for balance. Use a strong wire or ribbon to hang the snowman. Test the hanging before putting it up. Proper hardware ensures your decoration stays secure and looks great on the wall or door.
Display Ideas
Displaying your painted snowman on wood Christmas decoration can brighten your holiday space. Thoughtful placement adds charm and warmth to your home. Simple ideas help your decoration stand out beautifully.
Indoor Placement
Place the snowman near your fireplace for a cozy feel. Set it on a mantel or shelf where it catches the eye. Use soft lighting to highlight the colors and details. Group it with other holiday decorations for a festive look. A spot by the front door welcomes guests with holiday cheer.
Outdoor Use Tips
Choose a covered porch to protect the wood from rain and snow. Seal the decoration with a weatherproof finish before placing it outside. Secure it firmly to avoid wind damage. Position near pathways or garden beds to add holiday spirit outdoors. Bring it inside during harsh weather to keep it safe.
Troubleshooting Tips
Creating a painted snowman on wood can bring holiday joy to your home. Small mistakes may happen during the process. Knowing how to fix these issues saves time and keeps your decoration looking great. Here are helpful tips for common problems.
Fixing Paint Mistakes
Spilled paint or uneven strokes can happen easily. Wait until the paint is dry before fixing it. Lightly sand the area with fine sandpaper. This removes bumps and rough spots. Apply a thin layer of paint over the sanded area. Use a small brush for better control. Let the paint dry fully before adding more coats.
Preventing Wood Damage
Wood can crack or splinter during painting. Avoid using too much water when cleaning the wood. Always sand the wood gently before painting. Use a primer to protect the wood surface. Choose paint meant for wood to prevent peeling. Store your snowman decoration in a dry place to avoid moisture damage.
Frequently Asked Questions
What Materials Are Needed For A Painted Snowman Wood Decoration?
You need wood pieces, acrylic paints, brushes, sandpaper, and sealant. Optional items include stencils and embellishments for extra detail.
How Do I Prepare Wood For Snowman Painting?
Sand the wood smoothly to remove rough spots. Clean the surface and apply a base coat for better paint adherence.
What Paint Types Work Best On Wood Christmas Crafts?
Acrylic paints are ideal. They dry fast, provide vibrant colors, and are easy to use on wood surfaces.
How Can I Protect My Painted Snowman Decoration?
Apply a clear sealant or varnish after painting. It shields the paint from moisture and helps the decoration last longer.
Conclusion
Creating a painted snowman on wood brings joy to your holiday decor. This simple DIY adds a warm, personal touch to any space. You can enjoy crafting with family or friends, making memories along the way. Each snowman becomes a unique decoration that brightens the season.
Try different colors and styles for a fun twist. These handmade pieces last year after year, keeping holiday spirit alive. Give it a try and watch your home feel cozy and festive. Easy, fun, and special—perfect for Christmas cheer!