Are you looking to add a personal touch to your mugs without spending a fortune? Gorgeous vinyl designs are the perfect way to do just that—and you can create them right at home!
Imagine sipping your favorite drink from a mug that shows off your style, your mood, or even a fun message. In this post, you’ll discover simple, cute vinyl design ideas and easy steps to make your mugs stand out. Ready to turn plain mugs into eye-catching treasures?
Let’s dive in and get creative!
Materials Needed
Creating beautiful vinyl designs on mugs is fun and simple at home. To start, gather the right materials. This helps the project go smoothly and the results look great. Here is what you need to know about the materials for your vinyl mug project.
Choosing The Right Vinyl
Select vinyl made for mugs or glass surfaces. Permanent adhesive vinyl sticks well and lasts long. It resists water and washing better than removable vinyl. Pick vinyl in colors that match your design ideas. Matte or glossy finishes can change the look. Choose what fits your style best.
Essential Tools
Use a cutting machine to create precise vinyl shapes. If you do not have one, scissors can work for simple designs. A weeding tool removes extra vinyl from your design. Transfer tape helps move the design from paper to mug smoothly. Clean cloths and rubbing alcohol prepare the mug surface.
Selecting The Perfect Mug
Pick a mug with a smooth, clean surface. Ceramic mugs work best for vinyl designs. Avoid textured or curved mugs, as vinyl may not stick well. White or light-colored mugs make vinyl colors pop. Choose a size that fits your design space comfortably.
Design Ideas
Designing mugs with vinyl is fun and easy. You can create many styles at home. Simple tools and some creativity let you make beautiful mugs. Choose designs that fit your taste or the occasion. Here are some ideas to inspire your next project.
Popular Themes
Popular themes include nature, animals, and fun quotes. Flowers, leaves, and trees look great on mugs. Cute animals like cats, dogs, or birds add charm. Funny sayings or motivational words bring smiles. Pick themes that match your personality or mood.
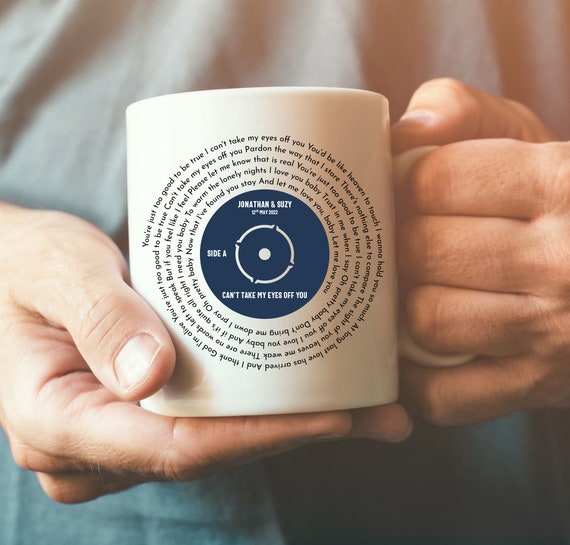
Personalized Monograms
Monograms make mugs unique and special. Use initials with stylish fonts for a personal touch. Add small decorations like hearts or stars around letters. These mugs make great gifts for friends and family. Everyone loves something made just for them.
Seasonal And Holiday Designs
Seasonal designs bring festive cheer to mugs. Snowflakes and reindeer suit winter holidays. Pumpkins and leaves fit autumn well. Bright flowers and sun shapes match spring and summer. Change your mugs with the seasons for fresh looks.
Preparation Steps
Starting with the right preparation makes your vinyl mug project easier and better. Good prep helps the vinyl stick well and last longer. Follow these simple steps to get your mug ready for a cute design.
Cleaning The Mug
Clean the mug surface carefully. Use warm water and soap to remove dirt and oil. Rinse it well and dry with a lint-free cloth. Avoid touching the area where the vinyl will go. This step keeps the surface smooth and clean for strong vinyl grip.
Measuring And Planning The Design
Measure the mug’s flat area where you want your design. Use a ruler or tape for accuracy. Plan the size and shape of your vinyl design to fit well. Draw a rough sketch on paper. This helps you place the design perfectly on the mug. Proper planning avoids mistakes and saves time.

Cutting And Weeding Vinyl
Cutting and weeding vinyl is a key step in making beautiful designs for mugs at home. It involves shaping the vinyl and then removing the extra parts that you do not need. This process helps your design look clean and sharp. Doing it carefully makes your mug art stand out and last longer.
Using A Cutting Machine
A cutting machine makes cutting vinyl fast and precise. You upload your design to the machine’s software. The machine then cuts the vinyl exactly as you want. It works well for detailed and small shapes. This tool saves time and reduces mistakes.
Manual Cutting Tips
You can cut vinyl without a machine using scissors or a craft knife. Use sharp tools for clean edges. Cut slowly and follow your design lines closely. For small details, a craft knife gives better control. Keep your hands steady for best results.
Removing Excess Vinyl
Weeding means pulling away the extra vinyl around your design. Use a weeding tool or a pin to lift small parts. Take your time to avoid tearing your design. Clear all tiny pieces for a neat finish. This step makes your design ready to stick on the mug.
Applying Vinyl To Mugs
Applying vinyl to mugs is a fun and simple way to create personalized designs at home. This craft lets you decorate mugs with cute patterns and names. The process involves careful placement and smooth application to make the design stick well. Follow these steps to get a clean, sharp look on your mug.
Aligning The Design
Start by cleaning the mug surface with rubbing alcohol. This removes oils and dirt. Next, position the vinyl design on the mug. Use a ruler or tape to keep it straight. Take your time to check the alignment from different angles. Proper placement ensures your design looks neat and balanced.
Smoothing And Securing
After placing the vinyl, press it down gently. Use a squeegee or credit card to smooth out the design. Apply firm, even pressure to help the vinyl stick. Work from the center outwards to avoid wrinkles. This step helps the vinyl bond tightly to the mug surface.
Avoiding Air Bubbles
Air bubbles can ruin the look of your vinyl design. To prevent them, press the vinyl slowly and steadily. If bubbles appear, use a pin to prick the bubble and press it flat. Smooth the area again with your squeegee. Careful application keeps your mug design flawless and long-lasting.
Sealing And Finishing
Sealing and finishing your vinyl designs on mugs is a key step. It protects your art and keeps the colors bright. Good sealing stops the vinyl from peeling or fading. This process also makes your mug safe to wash and use daily. Simple steps can give your project a neat, lasting look.
Heat Setting Techniques
Heat setting helps the vinyl stick better to the mug surface. Use a heat press or an oven at low temperature. Keep the heat for a few seconds only. Too much heat can damage the vinyl or mug. Use a clean cloth between the heat source and vinyl. This stops direct contact and protects the design.
Heat setting activates the adhesive on the vinyl. It makes the design more durable. Make sure to follow the vinyl maker’s instructions for best results. Test on a small area if unsure about the heat level.
Using Sealants Safely
Sealants add a protective layer over your vinyl. Choose a sealant suitable for mugs and vinyl. Water-based sealants are easier and safer to use at home. Apply thin, even coats for a smooth finish. Let each coat dry completely before adding another.
Work in a well-ventilated area to avoid fumes. Wear gloves to protect your skin. Keep sealants away from food areas on the mug. This ensures your mug stays safe for drinking. Proper sealing extends the life of your vinyl design.
Care And Maintenance
Taking care of vinyl on mugs is simple but important. Proper care keeps your designs bright and beautiful. It also stops the vinyl from peeling or fading. Follow easy steps to clean and protect your mugs. This helps your vinyl art last a long time.
Cleaning Tips
Use warm water and mild soap to clean the mug. Avoid harsh chemicals or scrubbers that can damage the vinyl. Wash the mug gently by hand. Do not put vinyl mugs in the dishwasher. Dry the mug with a soft cloth to prevent water spots. Clean your vinyl mug soon after use for best results.
Extending Vinyl Lifespan
Keep the mug away from direct sunlight for long periods. Heat can cause the vinyl to peel or fade. Avoid soaking the mug in water for too long. Do not use abrasive sponges or brushes on the vinyl. Store the mug in a safe place to stop scratches. These tips help your vinyl design stay fresh and new longer.
Troubleshooting Common Issues
Creating beautiful vinyl designs on mugs at home can be fun. Sometimes, small problems happen. These issues can make your project less perfect. Fixing them is easy with some simple tips. This section helps you solve common problems with vinyl on mugs.
Peeling Vinyl
Peeling happens when vinyl does not stick well. Clean the mug surface before applying vinyl. Use rubbing alcohol to remove dirt and oils. Press the vinyl firmly with a scraper tool. Let the vinyl set for a few hours before use.
Design Misalignment
Misaligned designs look uneven or crooked. Measure and mark the mug lightly with a pencil. Use a ruler or tape to guide your placement. Place the vinyl slowly, starting from one side. Adjust carefully before pressing down fully.
Bubbles And Wrinkles
Bubbles appear if air gets trapped under vinyl. Smooth the vinyl with a scraper from the center out. Use a pin to pop large bubbles gently. Wrinkles happen if vinyl stretches too much. Apply vinyl slowly and avoid pulling it tight.
Frequently Asked Questions
What Materials Do I Need For Vinyl Mug Designs?
You need adhesive vinyl sheets, a cutting machine or scissors, transfer tape, and blank mugs. Optional tools include weeding tools and a scraper for smooth application.
How Do I Apply Vinyl To A Mug At Home?
Clean the mug surface, cut your vinyl design, weed excess vinyl, use transfer tape, and carefully apply it to the mug. Press firmly to avoid air bubbles.
Can Vinyl On Mugs Be Dishwasher Safe?
Most vinyl designs are hand wash only to maintain durability. Avoid dishwasher use to prevent peeling or fading of the vinyl design.
What Are Easy Vinyl Designs For Beginners On Mugs?
Simple shapes, initials, or cute quotes are great for beginners. These designs are easy to cut and apply, providing a polished look with minimal effort.
Conclusion
Creating beautiful vinyl designs on mugs is simple and fun. You can personalize any mug with your favorite patterns. This craft adds a special touch to gifts or daily use. Practice a little, and your skills will improve quickly. Enjoy making each mug unique and full of charm.
Try different colors and shapes to find what you like best. Crafting at home saves money and brings joy too. Start today and see how creative you can be!