Are you ready to create something truly beautiful and lasting with your own hands? Resin crafts with flowers let you capture the delicate charm of nature in a glossy, durable finish.
Whether you want to make stunning jewelry, decorative trays, or keepsakes, this tutorial will guide you step-by-step to bring your floral art to life. You’ll learn how to perfectly preserve flowers and embed them in resin without bubbles or damage.
Imagine holding a piece of art that keeps your favorite blooms fresh forever—sounds amazing, right? Keep reading, and you’ll discover simple techniques that anyone can master to turn flowers into timeless resin treasures. Your creative journey starts here!
Flower Drying Techniques
Drying flowers properly is essential for beautiful resin crafts. Fresh flowers contain moisture that can cause resin projects to cloud or mold. Using the right drying method preserves color, shape, and texture. Different techniques suit different flower types and craft needs.
Below are three popular flower drying techniques. Each method helps maintain the flower’s natural beauty for resin art.
Using Silica Gel
Silica gel quickly dries flowers while keeping their shape intact. It absorbs moisture without flattening the petals. To use, cover flowers completely in silica gel crystals inside an airtight container. Leave them for several days until fully dry. This method works well for thick or delicate flowers.
Air Drying Methods
Air drying is the simplest way to dry flowers. Hang small bunches upside down in a dry, dark place. This keeps petals from fading and helps flowers keep their form. Thin or sturdy flowers dry best this way. The process can take one to three weeks.
Timing And Crispness
Timing affects flower crispness and color retention. Quick drying preserves bright colors but may make petals brittle. Slow drying keeps flexibility but can dull colors. Check flowers daily during drying. Remove them once petals feel dry and crisp but not brittle. This balance ensures the best look in resin crafts.
Preparing Resin And Molds
Preparing resin and molds is a key step in making beautiful flower resin crafts. It sets the stage for a smooth process and a flawless final piece. Careful preparation helps avoid bubbles, uneven surfaces, and other common issues.
Start with a clean mold and mix your resin carefully. Choosing the right type of resin ensures your flowers stay vibrant and clear inside the art.
Cleaning The Mold
Always clean your mold before use. Remove dust, dirt, and oils with a soft cloth. Use mild soap and water if needed. Dry the mold completely to prevent any moisture from mixing with the resin. A clean mold helps the resin cure smoothly and releases easily.
Mixing Resin Correctly
Follow the resin manufacturer’s instructions for mixing. Use precise measurements to avoid sticky or soft resin. Stir slowly and steadily for at least 3 to 5 minutes. Mix from the bottom up to blend resin and hardener well. Avoid whipping air into the mix to reduce bubbles.
Choosing Deep Pour Resin
Pick deep pour resin for thick flower crafts. It cures slowly, allowing you to embed flowers without trapping air. Deep pour resin stays clear and glossy after curing. It is perfect for creating layers and showing off flower details beautifully.
Embedding Flowers In Resin
Embedding flowers in resin creates beautiful, lasting art pieces. This process preserves the delicate beauty of flowers and encases them in clear, glossy resin. Each step requires care to keep flowers looking fresh and vibrant inside the resin. Follow these simple steps to embed flowers perfectly in your resin crafts.
Pouring The Base Layer
Start by mixing your resin according to the instructions. Pour a thin base layer into your mold or frame. This layer acts as the foundation for your flowers. Let it sit for a few minutes to become slightly sticky. This prevents the flowers from sinking too deep.
Positioning Flowers With Tweezers
Use tweezers to gently place dried flowers on the base layer. Arrange them carefully to show their best side. Tweezers give you control without damaging the petals. Press the flowers lightly to ensure they touch the resin base. Avoid air bubbles by placing flowers slowly and smoothly.
Securing Flowers To Prevent Floating
Flowers tend to float as you pour more resin. To stop this, wait until the base layer is partially cured before adding flowers. This makes the resin thicker and holds flowers in place. Pour resin slowly over the flowers in thin layers. This seals them without shifting their position. Repeat until flowers are fully covered and secure.
Layering And Curing Resin
Layering and curing resin are crucial steps in creating beautiful flower crafts. Proper layering keeps flowers in place and adds depth to your design. Correct curing hardens the resin to a smooth, glass-like finish. Understanding these steps helps avoid common mistakes and ensures a lasting piece.
Adding Subsequent Layers
Start with a thin base layer of resin. Let it partially cure before adding flowers. Use tweezers to place dried flowers carefully. Pour resin slowly over the flowers to avoid movement. Repeat layering until the flowers are fully covered. Each layer must dry before applying the next. This technique creates a 3D effect and protects the flowers inside.
Curing Time And Conditions
Resin needs time to cure completely. Usually, it takes 24 to 48 hours. Keep the project in a dust-free, dry place. Maintain a steady room temperature around 70°F (21°C). Avoid direct sunlight during curing. Too much heat or cold affects resin hardening. Patience is key to a clear, strong finish.
Avoiding Bubbles And Imperfections
Bubbles spoil resin’s smooth look. Mix resin slowly to reduce air bubbles. Use a heat gun or torch lightly on the surface. This helps pop trapped bubbles. Cover your workspace to prevent dust. Work in a calm environment to avoid shaking. Clear resin with no bubbles highlights the flower beauty perfectly.
Creative Resin Flower Projects
Creative resin flower projects bring nature into beautiful art forms. These projects preserve flowers in clear resin, creating lasting keepsakes. They are perfect for home decor or personal gifts. Each piece highlights the delicate beauty of flowers with a glossy finish. Simple techniques make these projects accessible for beginners and fun for all skill levels.
Explore ideas that combine creativity with floral elegance. Use resin to make unique items that brighten any space. These projects show how resin and flowers work well together to craft stunning art.
Floral Wall Hangings
Floral wall hangings add charm to any room. Pressed flowers are arranged inside resin panels or frames. Clear resin protects and enhances the flower’s colors and shapes. These hangings are lightweight and easy to display. Choose flowers that match your room’s style or season. The glossy resin surface reflects light, giving a fresh look. These decorations bring a natural touch to walls without fading.
Pressed Floral Trays
Pressed floral trays combine function with floral art. Embed dried flowers into resin trays for serving or decoration. The resin layer seals flowers, preventing damage from water or heat. These trays make great gifts or personal keepsakes. Customize trays with favorite flower types and colors. Smooth resin finishes ensure easy cleaning. These trays offer a blend of beauty and practicality.
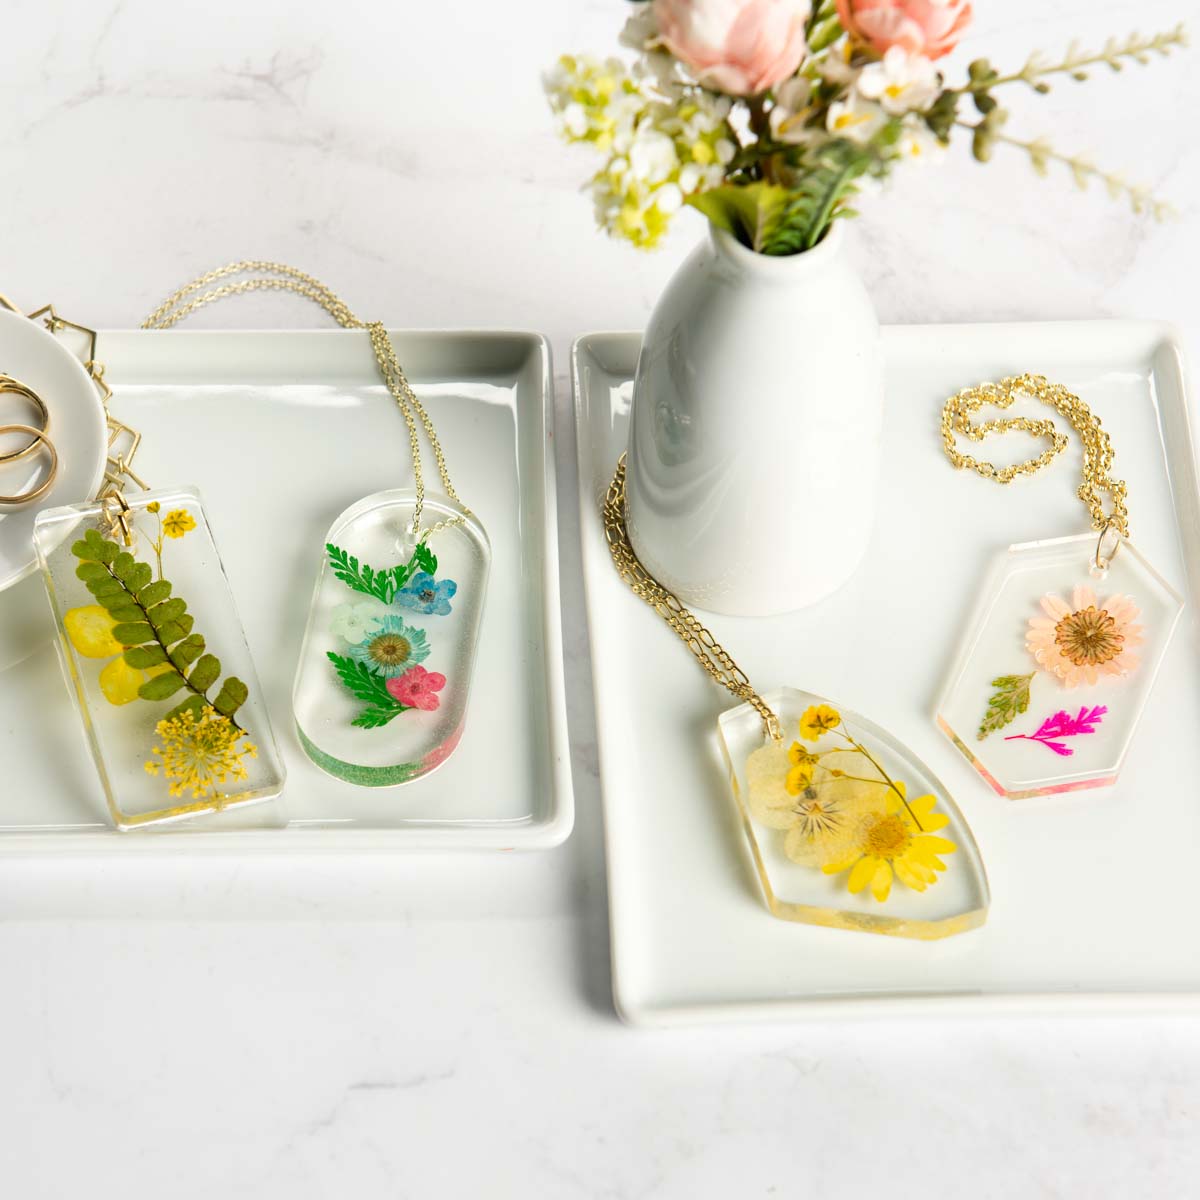
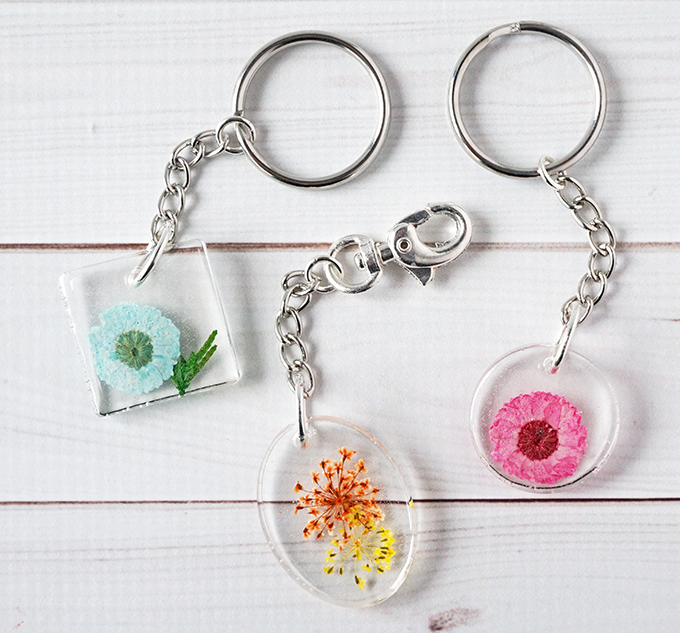
Jewelry And Accessories
Jewelry and accessories made with resin flowers are unique and stylish. Small dried flowers are placed in resin molds to create pendants, earrings, or rings. The resin preserves delicate petals and vibrant colors. These pieces add a natural, elegant touch to any outfit. Lightweight resin jewelry is comfortable to wear. Crafting flower accessories allows for endless design possibilities. Each item tells a floral story.

Materials To Avoid
Choosing the right materials is key for successful resin crafts with flowers. Some materials do not work well with resin. Using these can cause your project to fail or not look good. Avoiding such materials saves time and effort. Here are important materials to avoid for better results.
Non-adhesive Plastics
Plastics like polyethylene and polypropylene are poor for resin crafts. They have low surface energy, so resin won’t stick to them. Using these plastics leads to peeling or lifting of the resin layer. Avoid containers or molds made from these plastics. Opt for materials with better adhesion properties.
Teflon And Silicone Surfaces
Teflon, also called PTFE, is famous for its non-stick nature. Resin cannot bond with Teflon surfaces. Silicone molds can cause similar issues. Silicone creates a barrier that stops resin from curing properly on it. These surfaces might cause uneven curing or bubbles. Instead, use molds made of hard plastic or glass for smooth finishes.
Tips For Stunning Results
Achieving stunning results in resin crafts with flowers requires careful attention and simple techniques. These tips help you create beautiful pieces that last long. Follow these steps to improve your resin flower art.
Ensuring Complete Flower Dryness
Dry flowers fully before placing them in resin. Moisture causes bubbles and mold inside the resin. Use a flower press or silica gel to dry flowers quickly. Check flowers carefully to avoid any damp spots. Well-dried flowers keep their color and shape better.
Using Proper Tools
Use quality tools for mixing and pouring resin. A silicone mold works best for easy removal. Tweezers help place flowers gently without damage. Use disposable cups and stir sticks for clean mixing. Proper tools make your work neat and precise.
Maintaining Workspace Cleanliness
Keep your workspace clean and dust-free. Small dust particles can settle on resin and ruin its smooth finish. Cover your project while resin cures to protect it. Wipe surfaces before starting your craft. A clean area results in clearer, more beautiful resin art.
Frequently Asked Questions
How To Do Resin Art With Flowers For Beginners?
Dry flowers fully using silica gel. Mix resin and pour a thin base layer in a mold. Place flowers gently with tweezers. Let cure partially, then add more resin layers. Finish by curing completely for clear, beautiful floral resin art.
Do You Put Flowers In Before Or After Resin?
Dry flowers thoroughly before resin to prevent mold and bubbles. Pour a thin resin layer first, then place flowers. Add more resin layers to cover flowers completely.
What Should You Not Put In Resin?
Avoid putting wet or fresh flowers, silicone, Teflon, polyethylene, polypropylene, or materials that release air bubbles in resin.
How To Put A Flower In Resin?
Dry the flower completely using silica gel or air drying. Pour a thin resin layer in a mold. Place the flower with tweezers on the resin. Pour additional resin layers to cover the flower fully. Let each layer cure before adding the next.
Conclusion
Creating resin crafts with flowers is a fun and creative hobby. Dry flowers well to avoid bubbles or mold. Pour resin in thin layers to keep flowers secure. Use tweezers to place flowers gently and carefully. Let each resin layer partially cure before adding more.
With patience, your floral resin art will look beautiful. Try different flowers and shapes to find your style. Enjoy crafting unique pieces that brighten any space. Resin flower crafts offer endless ways to express creativity. Start small and watch your skills grow with each project.