Looking for a fun and creative way to add a personal touch to your home or gift something truly unique? You’re in the right place!
Resin crafts, especially making your own coasters, offer an exciting way to bring your artistic ideas to life with just a few simple steps. Imagine creating vibrant, glossy coasters that not only protect your surfaces but also showcase your style and creativity.
In this resin crafts tutorial, you’ll discover easy-to-follow tips and tricks to craft stunning coasters that will impress your friends and family. Ready to turn ordinary materials into eye-catching art? Let’s dive in and make your own beautiful resin coasters today!
Materials Needed
Creating resin coasters requires a few essential materials. These materials help you achieve smooth, vibrant, and durable results. Understanding what to use ensures your project goes well. Here is a breakdown of the key supplies needed for resin coaster crafting.
Choosing The Right Resin
Pick a clear epoxy resin designed for crafts. It must be non-toxic and safe to use indoors. Check the resin’s cure time and working time. A slower cure time gives more working time to add details. Avoid resins that yellow easily over time. UV-resistant resins keep your coasters looking fresh longer.
Selecting Molds And Tools
Use silicone molds shaped like circles or squares for coasters. Silicone molds are flexible and easy to release resin from. Have mixing cups and stir sticks ready for blending resin. Use gloves and a mask to protect your skin and lungs. A heat gun or torch helps remove air bubbles after pouring resin.
Pigments, Glitters, And Embellishments
Add color with resin pigments or alcohol inks. These come in many bright, opaque colors. Glitter adds sparkle and texture to your coasters. You can also embed small objects like dried flowers or beads. Choose embellishments that are lightweight and safe to seal in resin.
Preparing Your Workspace
Setting up your workspace is the first step in making resin coasters. A clean and organized area helps you work smoothly. It also keeps your project safe from mistakes and accidents. Preparing your workspace right means you can focus on creating beautiful resin crafts without interruptions.
Safety Measures
Choose a well-ventilated room for your resin work. Resin fumes can be harmful if you breathe them in for a long time. Wear gloves to protect your skin from resin and hardener. Use a mask designed for fumes to avoid inhaling chemicals. Cover your work surface with plastic or paper to catch spills. Keep a fire extinguisher nearby in case of emergencies. Avoid eating or drinking near your workspace to stay safe.
Organizing Supplies
Gather all your tools before starting the project. Place resin, hardener, mixing cups, and stir sticks within reach. Arrange pigments, glitter, or other decorations neatly. Have paper towels and cleaning wipes ready to clean spills quickly. Keep your molds on a flat surface to avoid uneven coasters. Organize everything to save time and reduce stress while crafting. A tidy workspace helps you work faster and enjoy the process more.
Mixing Resin
Mixing resin is a key step in making resin coasters. It affects the final look and durability of your craft. Getting the right mix ensures the resin cures properly. This section explains how to measure, combine, and add colors to resin. Follow these simple steps for smooth, beautiful results.
Measuring And Combining Components
Start by measuring the resin and hardener accurately. Use a digital scale or measuring cups for precision. The common ratio is 1:1 or 2:1, depending on the product. Pour both parts into a clean mixing cup. Stir slowly and steadily for at least 3 minutes. Scrape the sides and bottom to mix thoroughly. Avoid whipping air into the mixture to prevent bubbles.
Adding Colors And Effects
Add pigments, dyes, or mica powders to the mixed resin. Use small amounts and mix well to spread the color evenly. You can layer different colors for unique effects. Glitter or small decorations also work great in resin. Stir gently to keep the mixture smooth. Too much color can affect curing, so add colors carefully.
Pouring Techniques
Pouring techniques are the heart of creating resin coasters. They determine the final look and texture. By mastering simple methods, you can create unique and beautiful pieces. This section explains two popular pouring techniques for resin crafts.
Layering Colors
Start by mixing resin with different pigments or dyes. Pour one color into the mold first. Let it settle for a few minutes without curing fully. Then add the next layer of color on top.
This method creates depth and dimension in your coasters. Each layer blends slightly but keeps its distinct shade. Wait between pours to avoid colors mixing too much. Layering colors lets you control how the hues interact visually.
Creating Patterns And Designs
Pour resin carefully to form shapes and patterns. Use tools like sticks, combs, or even straws to drag or swirl the resin. This manipulation creates interesting effects and textures.
Try pouring drops of different colors in one spot. Then use a stick to spread or swirl them gently. Patterns like marbling, waves, or petals emerge from this technique.
Practicing simple motions helps you gain control over resin flow. You can create detailed designs or abstract art. Each coaster becomes a small artwork with unique character.
Embedding Decorations
Embedding decorations in resin coasters adds a unique charm and personal touch. This technique lets you capture small objects inside the clear resin. It creates a beautiful, lasting design that catches the eye. Choosing the right decorations and placing them carefully makes all the difference in your final piece.
Using Flowers, Shells, And Other Items
Pressed flowers bring natural beauty and color to resin coasters. They dry flat and fit perfectly under resin. Small shells add a beachy, textured look. Other items like glitter, beads, or tiny charms work well too. Pick decorations that are thin and dry to avoid bubbles or cloudiness.
Make sure your items are clean and completely dry. Moisture can cause resin to cure improperly. Arrange the decorations before pouring resin to visualize the final design. Experiment with layering items for depth and interest.
Tips For Placement
Place decorations gently on the resin surface or embed them in a thin resin layer. Use tweezers for precise positioning. Avoid overcrowding; leave some clear space for balance. Centering items can create a classic look.
Try off-center placement for a modern style. Keep decorations away from edges to prevent lifting or damage. Pour resin slowly to avoid moving decorations. Seal porous items with a clear spray before embedding to protect them.
Curing Process
The curing process is a key step in making resin coasters. It changes the liquid resin into a solid form. Proper curing ensures your coasters are strong and durable. The resin hardens over time by a chemical reaction. This process needs patience and care for the best results.
Setting Time
Resin setting time varies by brand and temperature. Most resins take 24 to 72 hours to cure fully. Warmer rooms speed up the curing process. Cooler rooms slow it down. Avoid moving or touching the resin during this time. Any disturbance can cause marks or dents on the surface.
Preventing Bubbles And Imperfections
Bubbles can ruin the smooth look of resin coasters. Mix resin slowly to reduce air bubbles. Use a heat gun or torch briefly to pop bubbles on the surface. Avoid shaking the resin jar before mixing. Pour resin in thin layers for better control. Cover the workspace to block dust and debris. This keeps the surface clean and clear.
Demolding Coasters
Demolding coasters is a key step in resin crafting. It reveals your hard work and beautiful designs. This process must be done carefully to avoid damage.
Patience is important. Resin needs to fully cure before removal. Usually, this takes 24 to 48 hours depending on the resin type and thickness.
Check Resin For Full Cure
Test resin hardness by gently pressing a corner. It should feel solid and no longer sticky. Soft or tacky resin means more curing time is needed.
Prepare Your Workspace
Clear a flat, clean surface for demolding. Have soft cloths or foam ready to place coasters on. This prevents scratches or dents after removal.
Use Gentle Pressure
Loosen edges by pressing or flexing the mold gently. Avoid sharp tools that can scratch or damage resin. Slowly push the coaster out from the mold.
Handle Coasters With Care
Hold coasters by the edges to avoid fingerprints. Place them on a soft surface immediately. Let them rest to ensure complete hardening.
Finishing Touches
Finishing touches transform your resin coasters from good to stunning. These final steps improve the look and durability. They help create a smooth, shiny surface that feels great to touch. Proper finishing also protects your artwork and keeps it lasting longer.
Sanding And Polishing
Start by sanding the edges and surface to remove any bumps. Use fine-grit sandpaper for a smooth finish. Sand lightly in circular motions for evenness.
After sanding, polish the coaster to bring out a glossy shine. Use a soft cloth or buffing pad with a polishing compound. This step makes the coaster look professional and smooth.
Adding Protective Coatings
Apply a clear protective coating to seal the resin surface. This guards against scratches and water damage. Use a spray or brush-on varnish made for resin crafts.
Allow the coating to dry fully before use. This layer keeps your coasters looking new and vibrant for a long time. Protective coatings also add a subtle shine that enhances the design.
Creative Design Ideas
Creative design ideas make resin coasters unique and fun to craft. They allow crafters to explore colors, shapes, and themes. These ideas can reflect personal style or match home decor. Here are some inspiring themes to try in your next resin coaster project.
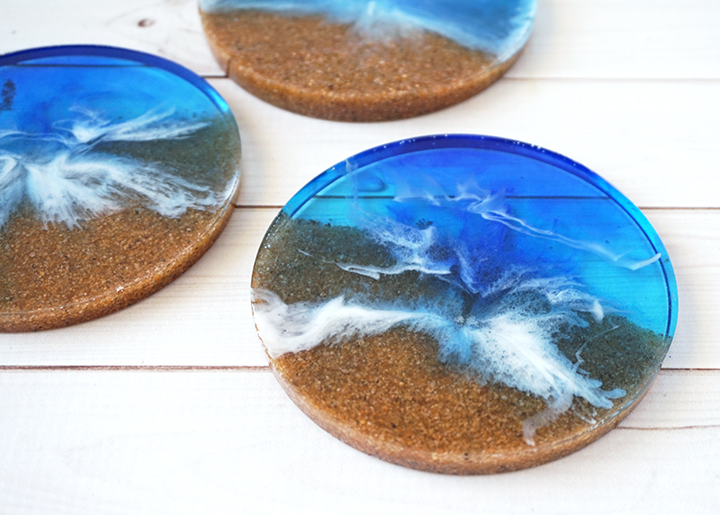
Beach And Ocean Themes
Capture the calm of the sea with ocean-inspired coasters. Use blue and green tones to mimic water. Add small shells, sand, or tiny starfish for texture. Create waves with white resin swirls for a realistic effect. These coasters bring a fresh, coastal feel to any room.
Geometric And Abstract Patterns
Geometric patterns offer clean lines and modern style. Use tape to create shapes like triangles, squares, or hexagons. Mix colors boldly for contrast or choose soft pastels for subtlety. Abstract designs allow freeform creativity with swirling colors and shapes. These patterns suit contemporary decor well.
Seasonal And Holiday Styles
Celebrate holidays by crafting themed resin coasters. Use reds and greens for Christmas or orange and black for Halloween. Add glitter or small festive decorations inside the resin. Seasonal coasters add charm and make great gifts. Change designs throughout the year to match each holiday mood.

Troubleshooting Tips
Troubleshooting is key for perfect resin coasters. Small mistakes can cause bubbles, stickiness, or cloudiness. Fixing these issues improves the look and feel of your crafts. Here are simple tips to solve common problems.
Fixing Bubbles And Uneven Surfaces
Bubbles appear when air gets trapped in the resin. Use a heat gun or torch gently over the surface. This helps bubbles rise and pop quickly.
Mix resin slowly and carefully to avoid adding air. Pour resin in a thin layer to reduce bubbles. For uneven surfaces, sand lightly with fine-grit sandpaper after curing. Then, apply a thin top coat of resin to smooth the finish.
Dealing With Sticky Or Cloudy Resin
Sticky resin means it did not cure fully. Check the mixing ratio of resin and hardener. Mix both parts thoroughly for at least three minutes.
Keep the resin at room temperature during curing. Cold temperatures slow down the hardening process and cause stickiness.
Cloudy resin can happen if moisture gets inside. Avoid working in humid places. If resin turns cloudy, sanding and applying a clear top coat can restore shine.
Care And Maintenance
Resin coasters look beautiful and last long with proper care. Taking good care keeps their shine and strength intact. Simple steps help maintain their charm daily. This section explains easy care and maintenance tips to keep resin coasters in top condition.
Cleaning Resin Coasters
Use a soft cloth or sponge for cleaning. Mild soap and warm water work best. Avoid harsh chemicals or abrasive scrubbers. Gently wipe the surface to remove dirt and stains. Dry coasters with a soft towel to avoid water marks. Clean spills immediately to prevent damage.
Avoiding Damage
Keep coasters away from direct sunlight for long periods. Heat can cause resin to discolor or warp. Do not place hot pots or pans directly on the coaster. Avoid sharp objects that can scratch the surface. Store coasters flat in a cool, dry place. Handle coasters carefully to prevent cracks or chips.

Gift And Decor Uses
Resin coasters offer more than just protection for your furniture. They make thoughtful gifts and charming decor pieces. Their unique designs and glossy finish catch the eye and spark conversations. These coasters can brighten any space or celebrate special moments.
Crafting resin coasters allows you to add personal touches. This makes them perfect for meaningful gifts. Their versatility also helps them fit into various home styles. Discover creative ways to use resin coasters for gifts and decor below.
Personalized Gift Ideas
Personalized resin coasters make memorable gifts. You can embed initials, names, or dates in the resin. This creates a keepsake that lasts for years. Adding small charms or meaningful objects adds a special touch.
Choose colors and themes that fit the receiver’s taste. Birthdays, weddings, and holidays are great occasions. A handmade coaster gift shows care and effort. Everyone appreciates a unique, custom-made present.
Incorporating Coasters Into Home Decor
Resin coasters blend well with many decor styles. Use them on coffee tables, dining tables, or desks. They protect surfaces while adding color and shine. Grouping coasters in sets creates visual interest.
Match coaster colors to your room palette. Use natural elements like pressed flowers or stones inside resin. These bring nature indoors and create a calming feel. Resin coasters also work as small art pieces around your home.
Frequently Asked Questions
What Materials Are Needed For Resin Coaster Crafts?
You need epoxy resin, hardener, molds, pigments, gloves, and mixing tools. Optional materials include glitter, dried flowers, and sealing spray for decoration.
How Long Does Resin Take To Cure For Coasters?
Resin typically cures in 24 to 72 hours depending on brand and temperature. Always follow manufacturer instructions for best results and full hardness.
Can Beginners Easily Make Resin Coasters At Home?
Yes, beginners can make resin coasters with simple supplies and step-by-step tutorials. Practice safety and precise mixing for successful projects.
How Do I Avoid Bubbles In Resin Coasters?
Mix resin slowly to minimize bubbles, use a heat gun or torch gently on the surface. Work in a dust-free environment for smooth finishes.
Conclusion
Creating resin coasters is fun and simple to try at home. You can personalize each piece with colors and designs. Just follow the steps carefully for the best results. These coasters make great gifts or a nice touch for your space.
Practice helps improve your skills over time. Enjoy making your own unique resin crafts today!