Are you curious about creating beautiful, glossy crafts that can brighten up your home or make perfect personalized gifts? Resin crafts offer a fun and rewarding way to turn simple ideas into stunning art pieces.
If you’re new to this exciting world, don’t worry—resin crafting is easier than you think, and you don’t need to be an expert to start. In this guide, you’ll discover everything you need to know to begin your resin journey, from choosing the right materials to mastering simple projects that will boost your confidence.
Ready to transform your creativity into shiny, lasting treasures? Let’s dive into the best resin crafts for beginners!
Choosing Resin Types
Choosing the right resin type is important for beginner crafters. Different resins offer different qualities and uses. Understanding these types helps you pick the best one for your project. This guide explains popular resin types and their benefits.
Epoxy Resin Benefits
Epoxy resin is clear and strong. It cures slowly, giving time to work. It is great for jewelry, coasters, and art pieces. Epoxy resin mixes easily with colors and additives. It creates a smooth, glossy finish. This resin is durable and resistant to scratches.
Uv Resin Uses
UV resin hardens quickly under UV light. It is perfect for small projects like charms and pendants. You can see the curing process fast. UV resin does not require mixing. It is less messy and easy to use. This resin is ideal for detailed work and quick crafts.
Safety Considerations
Always work in a well-ventilated space. Wear gloves to protect your skin from resin. Avoid direct contact with resin and hardeners. Keep resin away from eyes and mouth. Use a mask to avoid inhaling fumes. Follow instructions carefully to stay safe while crafting.
Essential Tools And Supplies
Starting resin crafts requires the right tools and supplies. These essentials help create beautiful projects with ease. Knowing what to use makes the process smooth and fun.
Mixing Equipment
Mixing resin properly is key to a good result. Use disposable cups to mix resin and hardener. Stir sticks help blend the two parts well. A digital scale ensures you measure the resin accurately. This prevents sticky or soft pieces. Gloves protect your hands from resin. A heat gun or torch removes bubbles after mixing.
Molds And Silicone Forms
Molds shape your resin into beautiful designs. Silicone molds are flexible and easy to use. They come in many shapes like circles, squares, and hearts. Choose molds based on your project needs. Clean molds after each use for the best finish. Using the right mold helps your project look professional.
Colorants And Additives
Colorants add life to your resin crafts. Use resin dyes or liquid pigments for bright colors. Mica powders give a shiny, pearly look. Additives like glitter or small beads create texture and interest. Mix colors and additives carefully for even distribution. These tools let you customize your crafts beautifully.
Basic Techniques To Try
Starting resin crafts can be exciting and fun. Learning basic techniques helps create beautiful pieces. These simple steps give control over the resin’s flow and finish. Practicing these methods builds confidence and skill for more advanced projects.
Measuring And Mixing Resin
Accurate measuring is key for a strong resin cure. Use a digital scale or clear measuring cups. Mix equal parts of resin and hardener carefully. Stir slowly to avoid creating bubbles. Mix for at least three to five minutes. Scrape the sides and bottom of the container. Proper mixing ensures the resin hardens well and stays clear.
Pouring And Layering
Pour resin slowly to control its spread. Use a silicone mold or a flat surface. Pour in thin layers to avoid overheating. Let each layer cure before adding the next. Layering adds depth and allows for embedding objects. This technique creates stunning, multi-dimensional effects in your crafts.
Removing Bubbles
Bubbles can ruin the smooth finish of resin crafts. Use a heat gun or a small torch to pop bubbles. Move the heat source quickly over the resin surface. Avoid holding the heat in one spot to prevent damage. You can also blow gently with a straw. Removing bubbles early keeps the resin clear and glossy.
Simple Resin Projects
Simple resin projects offer a great way to start crafting with resin. These projects require few materials and easy steps. They help beginners learn how resin works. You can create beautiful items that are useful and decorative. Each project lets you practice mixing, pouring, and curing resin. Try these ideas to build your skills and enjoy resin crafting.
Coasters With Embedded Objects
Making coasters is a popular beginner project. You can embed small objects like dried flowers, glitter, or beads. First, pour a thin layer of resin into a coaster mold. Place your objects carefully on top. Then, pour another layer to cover them. Let it cure fully before removing from the mold. These coasters look elegant and protect your furniture.
Jewelry Pieces
Resin jewelry is simple and fun to make. Use small silicone molds shaped like pendants or earrings. Add color with resin dyes or include tiny decorations. Pour resin into the molds and let it set. You can attach findings like hooks or chains after curing. Resin jewelry lets you create unique, wearable art easily.
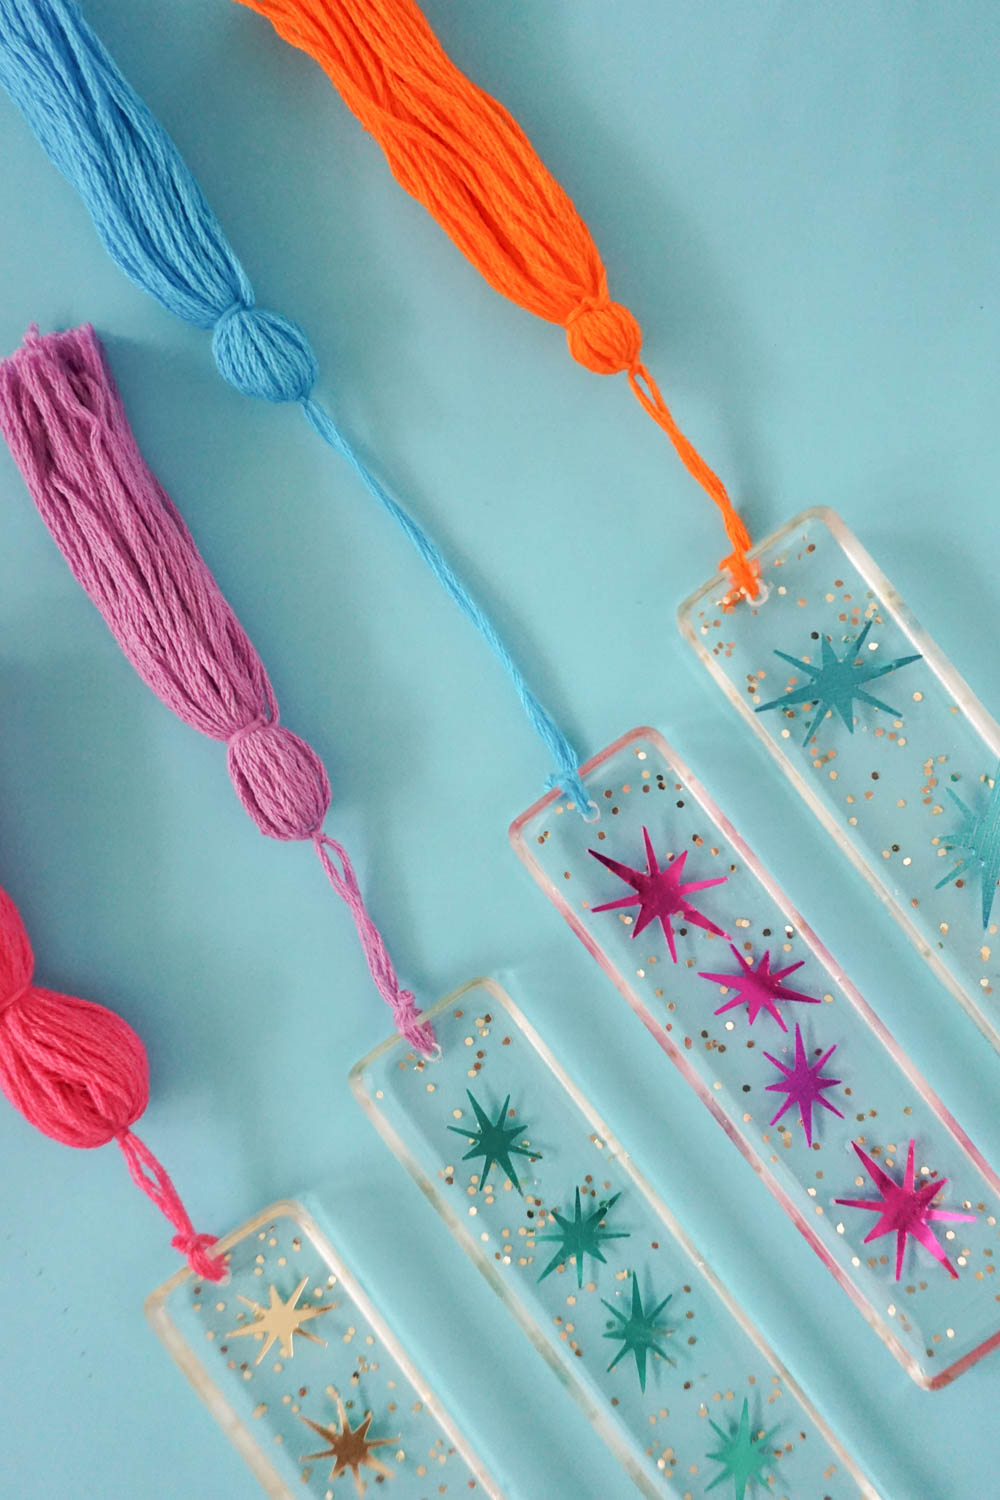
Keychains And Charms
Keychains and charms are quick resin crafts for beginners. Use small molds in fun shapes like hearts or stars. Add glitter or small trinkets inside the resin. Once cured, attach key rings or jump rings. These make great gifts or personal accessories. The project is simple and gives fast results.
Creative Embellishments
Creative embellishments transform simple resin projects into stunning art pieces. They add texture, color, and depth. Beginners enjoy experimenting with different materials to see unique effects. These small touches make each creation special and personal.
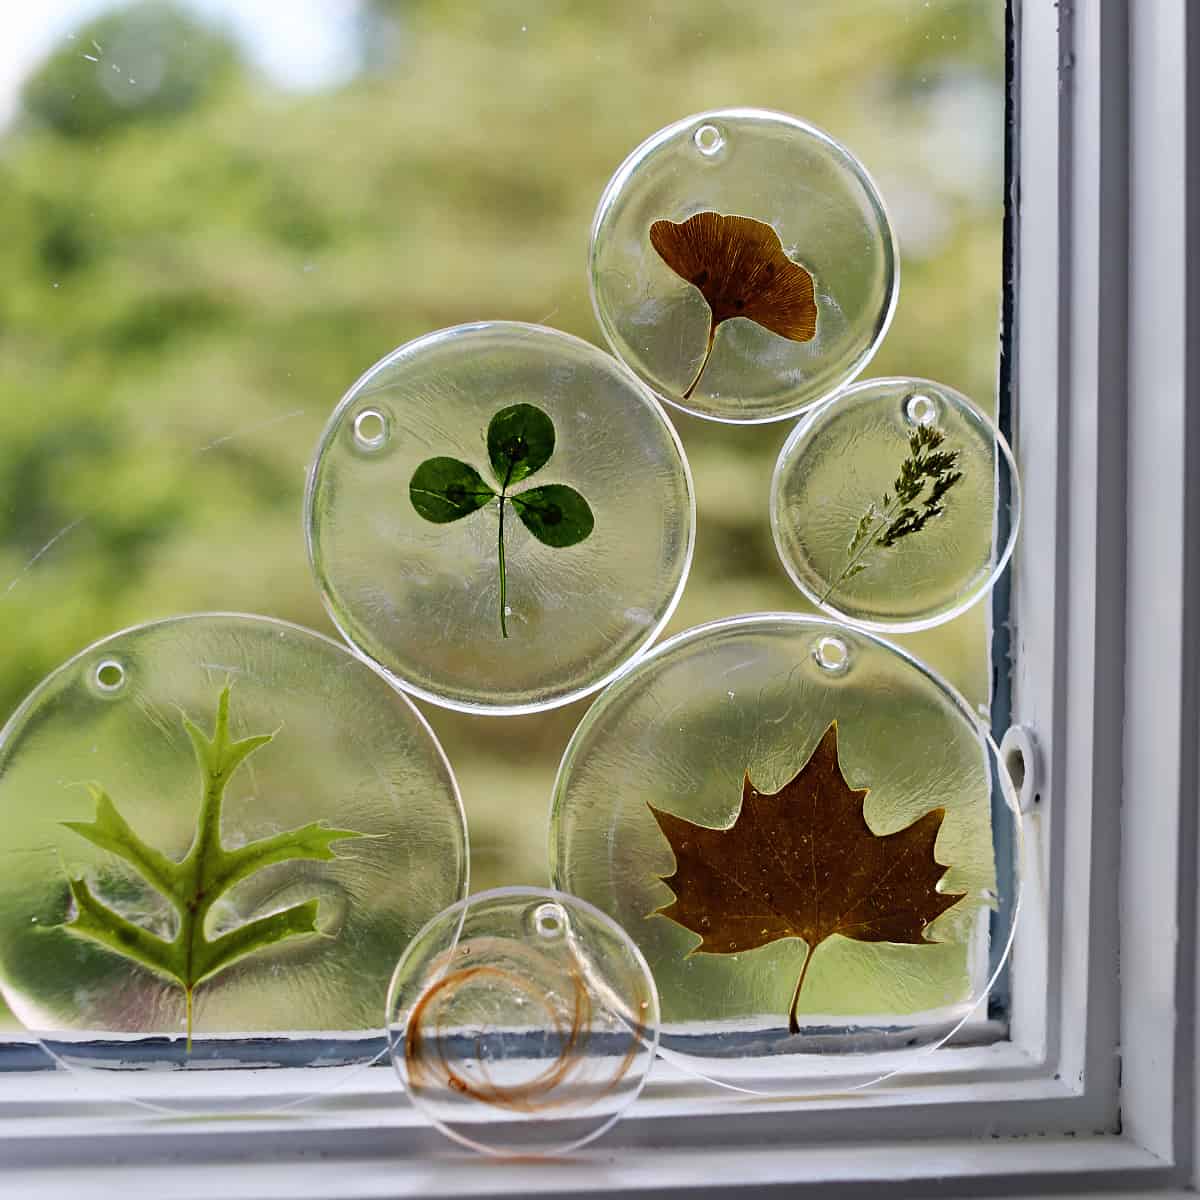
Using Dried Flowers
Dried flowers add natural beauty and charm to resin crafts. Choose small, flat blooms for easy embedding. Press flowers in a book for a few days to dry them well. Place them carefully in resin layers to avoid air bubbles. The colors and shapes create elegant, timeless designs.
Incorporating Glitter And Pigments
Glitter brings sparkle and fun to resin projects. Use fine glitter for a smooth finish or chunky glitter for more texture. Pigments add rich color and depth. Mix them into resin before pouring. Experiment with different shades to create custom effects. They brighten your craft and make it eye-catching.
Adding Metallic Foils
Metallic foils add shine and luxury to resin crafts. Gold, silver, and copper foils work well. Tear foils into small pieces or strips. Gently press them onto resin while still sticky. Foils reflect light and give a professional look. They enhance designs with a touch of glamour and elegance.

Troubleshooting Common Issues
Troubleshooting common issues in resin crafts helps beginners get better results. Resin projects can face small problems that affect the final look. Fixing these issues early saves time and material. Understanding simple solutions makes crafting more fun and less frustrating.
Avoiding Sticky Surfaces
Sticky resin surfaces happen if the mixture is not right. Always measure resin and hardener carefully. Mix slowly but thoroughly to prevent sticky spots. Use a clean container and tools to avoid contamination. Keep the working area dust-free and dry. Allow enough curing time before touching the piece.
Preventing Yellowing
Yellow resin ruins the clear look of crafts. Use UV-resistant resin to slow down yellowing. Store resin in a cool, dark place to keep it fresh. Avoid direct sunlight on finished projects. Use white or light-colored molds for better color retention. Work in a cool room to reduce heat effects on resin.
Fixing Air Bubbles
Air bubbles create small holes and rough surfaces. Mix resin slowly to reduce bubbles. Let resin sit for a few minutes before pouring. Use a heat gun or torch gently over the surface to pop bubbles. Pour resin in thin layers to avoid trapping air. If bubbles remain, poke them with a toothpick carefully.
Tips For Safe Resin Crafting
Working with resin is fun and creative. Safety is very important to enjoy resin crafts. Following safety tips keeps you healthy and your workspace clean. These simple steps help beginners avoid common risks.
Proper Ventilation
Always work in a well-ventilated area. Resin fumes can be harmful if you breathe them too long. Open windows or use a fan to move air. Good airflow helps reduce strong smells and keeps the air fresh. Avoid working in small, closed rooms.
Protective Gear
Wear gloves to protect your skin from resin. Resin can cause irritation or allergic reactions. Use safety glasses to protect your eyes from splashes. A mask helps you avoid breathing in dust or fumes. Long sleeves can protect your arms from spills.
Safe Disposal Practices
Do not pour leftover resin down the drain. Resin can clog pipes and harm the environment. Let leftover resin harden before throwing it away. Dispose of resin waste in a sealed container. Check local rules for hazardous waste disposal.
Selling Your Resin Crafts
Selling your resin crafts can turn your hobby into a small business. It allows you to share your art with others and earn money. Understanding what sells well, how to price, and how to package your items helps you stand out. This section guides you through these key steps to start selling your resin crafts with confidence.
Popular Items To Sell
Resin coasters and jewelry are top sellers. Keychains, bookmarks, and phone cases also attract buyers. Small decorative items like paperweights and trays work well. Personalized crafts with names or dates bring more interest. Focus on items that are easy to ship and use simple designs.
Pricing Strategies
Calculate the cost of materials before setting prices. Add time spent crafting to your cost for fair pricing. Research similar items online to know market rates. Offer bundles or discounts to encourage more sales. Keep prices competitive but never sell below your costs.
Packaging Ideas
Use sturdy boxes or padded envelopes to protect crafts. Add tissue paper or bubble wrap for extra safety. Include a thank you note to create a personal touch. Keep packaging simple but neat to lower shipping costs. Use eco-friendly materials to appeal to conscious buyers.
Resources For Beginners
Starting with resin crafts can feel overwhelming without the right support. Luckily, many resources exist to guide beginners step-by-step. These resources help you understand tools, materials, and techniques clearly. They provide a solid foundation for your creative journey in resin art.
Recommended Kits
Starter kits simplify resin crafting for beginners. These kits include resin, hardeners, molds, and basic tools. They help avoid confusion about what to buy first. Some popular kits offer clear instructions to follow. Buying a kit can save money and time. It also ensures you have all needed materials to start immediately.
Tutorials And Workshops
Online tutorials are excellent for learning resin basics. Videos and step-by-step guides show techniques and safety tips. Workshops offer hands-on experience with expert help. Many free tutorials cover simple projects like coasters and jewelry. Paid workshops provide in-depth lessons and personalized feedback. Choose resources that explain clearly and use simple language.
Community Groups
Joining resin craft groups connects you with other beginners and experts. These groups offer support, advice, and project ideas. You can ask questions and share your work for feedback. Online forums and social media groups are active and friendly. Being part of a community boosts confidence and keeps motivation high. It also helps you learn from others’ successes and mistakes.
Frequently Asked Questions
What Is The Best Craft Resin For Beginners?
The best craft resin for beginners is epoxy resin. It offers easy mixing, clear finish, and strong durability, ideal for simple projects.
How To Start Resin Art As A Beginner?
Start resin art by gathering safety gear and beginner epoxy resin. Choose simple molds, mix resin precisely, and work in a ventilated area. Practice pouring techniques and cure pieces under recommended conditions. Gradually experiment with colors and inclusions to create unique resin art projects.
What Is The Downside Of Resin?
Resin can emit harmful fumes during curing and may cause skin irritation. It also requires careful mixing and curing time.
What Resin Crafts Sell The Best?
Resin crafts that sell best include jewelry, coasters, keychains, and decorative trays. Customized and floral designs attract more buyers.
Conclusion
Resin crafts offer a fun and creative way to make unique items. Beginners can start with simple projects like coasters or jewelry. Using resin helps you explore colors, shapes, and textures easily. Always follow safety steps to protect your skin and workspace.
With practice, your skills will improve and ideas will grow. Resin crafting can bring joy and relaxation to your day. Try it out and enjoy creating something special with your own hands.