Getting the perfect finish with resin starts the moment you mix it with the hardener. If you’re rushing or guessing the measurements, you risk ruining your project with sticky, uneven, or weak results.
But don’t worry—by following a few simple steps, you can master the mixing process and achieve smooth, strong, and flawless resin every time. Ready to learn how to mix resin and hardener like a pro? Keep reading, because your next project deserves the best finish possible.
Key Takeaways
Perfect results depend on accurate measuring and thorough mixing of resin and hardener. Timing and temperature also play a big role in curing. Small mistakes can cause problems, so careful steps ensure strong, clear finishes every time.
Mastering the essentials of mixing resin and hardener lays the foundation for flawless results. Paying close attention to measurement, mixing technique, container choice, and environmental conditions will greatly enhance the quality and durability of your finished project.- Use accurate, calibrated measuring instruments to ensure the resin and hardener are combined in the exact proportions required.
- Blend the components gently and continuously for a minimum of three minutes to minimize the introduction of unwanted air pockets.
- Choose a clean container made from plastic or silicone rather than glass to avoid any chemical reactions or impurities.
- Keep the working environment consistently between 75 and 85 degrees Fahrenheit (24 to 30 degrees Celsius) to promote proper curing and optimal performance.
Safety And Equipment Preparation
Ensuring a safe environment and preparing your tools correctly are fundamental steps before working with resin and hardener. Taking the right precautions not only protects your health but also enhances the quality of your results.
Start by equipping yourself with essential protective gear. Safety goggles shield your eyes from accidental splashes, while disposable nitrile or reusable latex gloves safeguard your hands against irritants and sticky residues. These precautions help prevent skin contact and eye injuries caused by the chemicals involved.
Setting up an ideal workspace is equally important. Choose a well-ventilated area to reduce exposure to potentially harmful fumes—this could be near an open window, with a fan circulating fresh air, or even outdoors in a sheltered spot. Keep your work area tidy and free from dust or grease, as contaminants can interfere with the bonding process. Ensure all mixing containers and tools are thoroughly cleaned before use.
Accuracy during mixing plays a crucial role in achieving optimal curing. Utilize a precise digital scale that measures as finely as 0.01 ounces or calibrated measuring cylinders to weigh or measure your resin and hardener. Maintaining the correct ratio is vital for the chemical reaction to proceed properly and for the final product to set correctly.
Review the technical data sheets provided by the resin manufacturer before starting your project. These documents contain key safety instructions and detailed mixing ratios specific to the product you’re using. Following these guidelines closely will make your mixing process safer and improve your chances of a flawless finish.
Selecting The Right Resin
Choosing the ideal resin is crucial to ensure your project meets its specific demands, whether you’re aiming for a casting or a protective coating. Each type of resin brings its own characteristics and suitability for various uses.
Resins with a higher viscosity are excellent for achieving a shiny, polished surface, while those with lower viscosity flow more easily, making them better suited for deep pours where bubble escape is essential.
It’s essential to pick colorants that are specially designed for epoxy resins and follow the manufacturer’s guidelines to ensure a smooth blend and optimal results.
Types Of Resin
Understanding the different resin varieties is key to selecting the perfect one for your project’s unique needs. Each resin type varies in its chemical makeup, mixing proportions, and ideal applications.
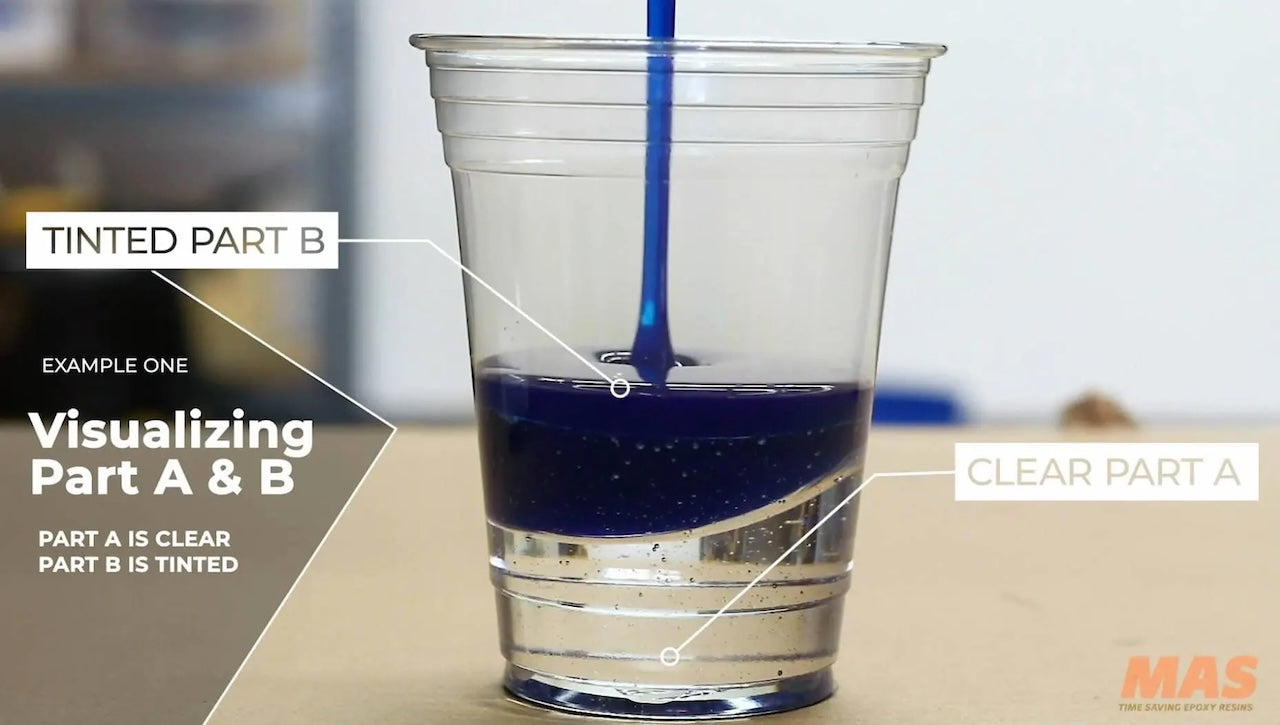
For example, ArtResin is popular among creatives for its straightforward 1:1 mix ratio, crystal-clear finish, and built-in UV resistance—ideal for preserving the vibrancy of artistic creations and decorative objects.
Epoxy coatings, often mixed at ratios like 2:1 or 3:1, provide robust, long-lasting protection on surfaces such as wood, concrete, and metal. These resins are engineered to endure heavy use, making them suitable for floors, countertops, and other high-traffic areas.
Choosing pigments or dyes made specifically for your resin type ensures compatibility, preventing unwanted chemical reactions or texture issues.
For projects that require a lustrous finish, selecting a resin with higher viscosity is advantageous. Conversely, if minimizing trapped air is a priority, opting for a resin with lower viscosity will facilitate better bubble release. Grasping these differences helps you make an informed resin choice that guarantees project success.
Application Considerations
Matching the right resin to your project depends on clearly understanding the intended use and desired outcome. Different applications demand tailored resin properties to achieve the best performance and appearance.
Accurate Measuring Techniques
Achieving precise measurements is a crucial step in mixing resin and hardener correctly, ensuring the epoxy cures perfectly and performs as expected. Precision tools and careful techniques are key to maintaining the proper ratios and avoiding costly mistakes.
Using well-calibrated instruments is vital to get the exact amounts of resin and hardener. Employing a measurement cup marked with clear, accurate gradations helps maintain the recommended 2:1 volume ratio of resin to hardener. Before adding resin, tare the scale with the empty mixing container to eliminate any weight discrepancies, ensuring the readings reflect only the materials being measured.
Measure each component separately to reduce waste and guarantee the correct proportions. When using weight as a metric, aim for at least 1.47 ounces of combined epoxy to secure reliable curing, allowing a tolerance of up to 5% error for the hardener. Pay attention to the meniscus line when reading liquid volumes in graduated cups, as this ensures that the resin and hardener quantities are as accurate as possible.
Below is a helpful chart summarizing these measuring essentials:
| Measuring Approach | Necessary Tool | Important Tip |
|---|---|---|
| Volume Measurement | Calibrated measuring cup | Check meniscus alignment |
| Weight Measurement | Digital weighing scale | Zero scale with container on it |
| Mixing Process | Clean mixing vessel | Measure components independently |
Following these guidelines will lead to a consistent epoxy mixture, delivering strong adhesion and flawless curing for your resin projects.
Weight Vs. Volume Measurement
Choosing between weight and volume for measuring resin and hardener plays a crucial role in achieving the perfect mix and ensuring the durability of your final piece.
Using weight as a measurement technique often delivers superior accuracy because resin and hardener can differ significantly in density. For example, a common weight ratio for a two-part epoxy might be 100 grams of resin to 50 grams of hardener. This method reduces the chances of imbalance, leading to a consistent and dependable cure.
Measuring by volume offers simplicity and speed, yet it requires precise handling. With the use of properly marked measuring containers, a typical volume ratio could be 3 parts resin to 1 part hardener. Ensuring you read the liquid levels at eye level and at the correct meniscus is essential for maintaining the correct proportions.
Consider these points to decide which approach suits your project best:
- Weight benefits: Offers greater precision by accounting for density differences between components.
- Volume factors: Faster and easier but demands careful measurement to avoid inaccuracies.
- Practical illustration: For a 3:1 volume mix totaling 6 ounces, the equivalent weight might be approximately 4.2 ounces of resin and 1.8 ounces of hardener.
Grasping these measurement techniques can significantly enhance the success and quality of your resin creations.
Mixing Resin And Hardener
Combining resin and hardener correctly is a vital step to ensure a flawless finish and proper curing. Precision in measuring and mixing according to the manufacturer’s instructions guarantees the chemical reaction proceeds smoothly, resulting in a durable and clear final product.
Accurately measuring the components is crucial, with the most common ratio being two parts resin to one part hardener, either by weight or volume. Employing clean, disposable plastic containers helps maintain accuracy and avoids contamination, which can compromise the resin’s quality and performance.
After measuring, blend the resin and hardener carefully, stirring continuously for a minimum of three minutes. Be sure to scrape the edges and bottom of the cup to achieve a consistent mix free from streaks or cloudiness. Keeping the workspace temperature between 75-85°F (24-30°C) supports optimal curing conditions and reaction speed.
To reduce the formation of air bubbles, mix slowly and with intention. Persistent bubbles may be removed using a vacuum chamber after mixing, which can enhance the clarity and strength of the cured resin.
| Step | Details |
|---|---|
| 1. Measure | Follow the recommended ratio (e.g., 2 parts resin to 1 part hardener) |
| 2. Combine | Pour both components into a clean, disposable plastic cup |
| 3. Stir | Mix thoroughly for at least 3 minutes, ensuring to scrape the container sides and bottom |
| 4. Temperature | Maintain the environment between 75-85°F (24-30°C) for optimal curing |
| 5. Air Bubbles | Stir slowly to minimize bubbles; use a vacuum chamber if bubbles remain |
Proper Mixing Techniques
Mastering the correct approach to blending resin and hardener is crucial for producing a smooth, consistent mixture that cures properly and yields a flawless finish. Precise attention to detail during mixing prevents common mistakes and ensures your project turns out as intended.
Begin by accurately measuring the components using a clean, graduated container. For a standard epoxy blend, mix two parts resin (Component A) with one part hardener (Component B). Maintaining exact proportions is vital for achieving the right chemical balance and ensuring the resin sets correctly.
Mix the two parts gently but thoroughly for at least three minutes, taking care to scrape the sides and bottom of the mixing vessel. Stirring slowly helps reduce the introduction of air bubbles, which can compromise the surface quality.
Keep the following tips in mind:
- Use a stopwatch or timer to monitor mixing time; excessive stirring can cause heat buildup, while insufficient mixing results in sticky or uneven surfaces.
- Transfer the blended mixture into a clean container to separate it from any unmixed residue clinging to the original cup.
- Employ a vacuum chamber after mixing to effectively eliminate trapped air bubbles for a crystal-clear finish.
Application And Working Time
Understanding the application phase and the limited working time of resin mixtures is crucial for achieving flawless results. Resin begins to cure once mixed, leaving a specific timeframe where it remains pliable and ready for use. Mastering this period ensures your project comes together smoothly without compromising the bond strength or finish quality.
Typically, the workable span lasts around 35 to 45 minutes, but this can shrink if you’re mixing larger quantities, as heat buildup accelerates the curing process. Think of it like molding clay that slowly hardens—you want to shape and join pieces before it stiffens. Acting promptly after blending your resin and hardener is key to making the most of this timeframe.
During this “open time,” assembling components and securing them with clamps is ideal to maintain precise alignment. Pay close attention as the resin transitions from fluid to gel consistency. If the surface remains tacky, layering additional coats is possible without sanding or prepping, much like adhering a fresh label onto a sticky surface for a strong, seamless bond.
Curing Processes And Phases
After mixing resin and hardener correctly, the next crucial step is understanding how the curing process unfolds. This transformation from a fluid mixture to a solid form involves several important stages that determine the quality and durability of your finished piece.
The curing journey is divided into three main phases: the workable period known as open time, the gel phase where the mixture starts to thicken, and the final solidification stage. Each phase plays a significant role in ensuring your epoxy achieves optimal results.
Environmental factors, particularly temperature, have a strong impact on the curing speed and effectiveness. Warmer settings can accelerate the process, so monitoring the temperature in your workspace helps maintain control over curing times and end quality.
The Three Phases Of Epoxy Curing
Grasping the distinct phases of epoxy curing is essential for mastering resin projects. The process evolves through the liquid phase, gel phase, and solid phase, each affecting how the epoxy behaves and bonds.
During the initial liquid phase—often called open time—the epoxy remains fluid and fully workable. This window allows you to spread, shape, and adjust the resin before it begins to set.
Next, the epoxy enters the gel phase, where it thickens and develops a tacky surface. This stage is key for joining surfaces as the resin is firming up but still flexible enough to create a strong adhesive bond.
Finally, the epoxy reaches the solid phase, completing its cure and gaining maximum hardness and strength. This final stage typically requires 24 to 48 hours, influenced by factors like ambient temperature and humidity levels.
- Liquid Phase: Resin remains fluid and easy to work with.
- Gel Phase: The mixture thickens and becomes sticky, perfect for adhesion.
- Solid Phase: Fully hardened and strong.
Recognizing these stages helps ensure your epoxy projects cure perfectly, producing smooth, durable finishes every time.
Impact Of Temperature On Epoxy Curing
Temperature plays a vital role throughout the curing process, affecting both the pace and quality of each phase. Higher temperatures can noticeably speed up the transition from liquid to solid, reducing working time but allowing faster project completion.
Conversely, cooler conditions slow the cure, extending the open time but requiring more patience before handling or demolding. Maintaining a stable, moderate temperature in your work area is key to balancing ease of application with timely curing.
Monitoring and adjusting your environment accordingly will lead to consistent results and prevent issues such as incomplete curing or surface imperfections.
Surface Preparation For Bonding
Achieving a durable and lasting bond with epoxy resin relies heavily on the condition of the surface prior to application. Preparing the surface correctly ensures the resin adheres firmly, preventing future issues like peeling or weak spots. Attention to cleanliness and surface texture forms the foundation of successful bonding. Follow these essential steps to prepare your surfaces effectively:
Surface Cleaning: Begin by thoroughly removing all dirt, oils, and residues using suitable cleaning agents or solvents. Ensuring the surface is free from any contaminants significantly improves the epoxy’s grip and overall bond strength.
Texture Creation: After cleaning, lightly sand smooth or shiny surfaces using 80-grit sandpaper. This process roughens the area, allowing the epoxy to lock in mechanically, which is especially important when applying resin over fully cured layers.
Eliminating Amine Blush: During curing, a greasy or waxy film known as amine blush can form and interfere with adhesion. This layer should be rinsed off using water and scrubbed gently with abrasive pads before adding more epoxy to maintain optimal bonding conditions.
Preventing Adhesion Issues
Ensuring flawless adhesion requires careful surface preparation and attention to detail before applying epoxy. Any residues such as oils, dust, or amine bloom can drastically weaken the bond, causing adhesion failures. Thoroughly rinsing the surface with clean water and scrubbing with abrasive materials effectively eliminates amine bloom. For shiny, fully cured areas, gently roughening the surface using 80-grit sandpaper helps create a micro-texture that promotes better mechanical grip.
To avoid unintended sticking, protective barriers like clear adhesive film, plastic sheets, or release agents are useful. Testing adhesion on a small, hidden section first ensures the epoxy adheres as expected, minimizing risks to the entire project.
| Step | Action | Purpose |
|---|---|---|
| 1. Surface Cleaning | Rinse with water and scrub with abrasive pads | Eliminate amine bloom and surface impurities |
| 2. Abrasion | Sand fully cured glossy surfaces with 80-grit sandpaper | Develop a textured surface for improved bonding |
| 3. Barrier Application | Cover areas with clear tape or plastic sheeting | Prevent epoxy from sticking where not wanted |
| 4. Pre-Testing | Perform adhesion checks on a discreet spot | Confirm bonding strength before full application |
| 5. Final Prep | Ensure surfaces are completely dry and free of dust | Avoid peeling or delamination issues later on |
Finishing And Uv Protection
Ensuring a flawless finish on epoxy resin creations not only boosts their visual charm but also significantly extends their lifespan. Proper finishing techniques combined with effective UV safeguards are key to maintaining the integrity and brilliance of your resin projects over time. Below are practical methods to achieve lasting protection and an impeccable surface.
Protective Coatings: Utilizing two-part polyurethane coatings delivers a robust and UV-stable layer, perfect for shielding cured epoxy from environmental wear and tear.
UV Shielding: Applying high-gloss white finishes enhances resistance to discoloration and yellowing caused by sunlight exposure, preserving the original look longer.
Heat Treatment: Subjecting epoxy pieces to controlled post-curing heat cycles can improve their mechanical strength and thermal stability, resulting in a more resilient product.
Waterproof Sealing: A quality topcoat acts as a moisture barrier, preventing water infiltration that could otherwise degrade the resin surface over time.
Employing these finishing practices ensures your epoxy resin projects maintain their stunning appearance and structural integrity for years to come.
Keep in mind that while finishing coats provide a polished sheen, UV protection plays a crucial role in preventing your hard work from fading or yellowing under sunlight.

Frequently Asked Questions
Addressing common inquiries can clarify crucial aspects of mixing resin and hardener to ensure flawless outcomes. Below are answers to some frequently posed questions that help demystify the process and avoid typical pitfalls.
What Is the Correct Ratio for Mixing Resin and Hardener?
Each resin type requires a specific proportion of resin to hardener, often detailed by the manufacturer. For example, the Super SAP CLR epoxy system typically calls for a 2:1 ratio, measured either by weight or volume, to achieve optimal curing and material strength.
How Should Resin Be Mixed Properly?
Accurate mixing hinges on precise measurement tools and thorough blending. Using calibrated scales or measuring cups ensures the right proportions, while stirring the mixture well helps prevent incomplete curing. Neglecting these steps can result in sticky or weak end products.
Which Component Should Be Poured First: Resin or Hardener?
Pouring resin before hardener is usually recommended because resin’s thicker consistency makes it easier to measure first. Different formulas might have specific instructions, so consulting the product’s guidelines remains essential for proper procedure.
Does Adding Extra Hardener Speed Up the Curing Process?
Adding more hardener than specified won’t accelerate curing; it can actually interfere with the chemical reaction. Excess hardener may cause uneven hardening, generate excessive heat, or create surface imperfections. Sticking to the recommended ratios ensures the best finish and durability.
Conclusion
Wrapping up the essentials of mixing resin and hardener highlights the importance of careful safety practices, accurate measuring, and thorough blending to ensure optimal results.
Ensuring the resin cures properly and that surfaces are well-prepared is vital for avoiding bonding problems and achieving a solid, lasting connection.
Attention to finishing touches and protecting the resin from UV exposure greatly enhances the strength and lifespan of the final product.
Adhering to these guidelines consistently delivers reliable performance and superior quality in all resin-related projects.

Frequently Asked Questions
What Is The Correct Resin To Hardener Ratio?
The ideal resin to hardener ratio depends on the product. Most epoxies require a 2:1 or 1:1 mix. Always check the manufacturer’s instructions. Accurate measurement ensures proper curing and strength.
How Long Should I Mix Resin And Hardener?
Mix resin and hardener thoroughly for at least 2 to 3 minutes. Proper mixing avoids sticky or soft spots. Use slow, steady stirring to reduce air bubbles.
Can I Speed Up The Curing Time Of Resin?
You can speed curing by increasing temperature slightly or using fast hardeners. Avoid excessive heat, which can cause cracks. Follow product guidelines for best results.
What Tools Are Best For Mixing Resin And Hardener?
Use a clean, disposable mixing cup and a wooden or plastic stir stick. Avoid metal tools, as they may react with resin. Stir slowly to minimize bubbles.
Conclusion
Mixing resin and hardener correctly ensures strong, clear results. Measure both parts carefully for the best bond. Stir slowly to avoid bubbles and uneven curing. Work in a clean, dust-free area to keep the mix pure. Follow the instructions on your product for timing and ratios.
Practice makes perfect—each project helps you improve. Proper mixing leads to durable, smooth finishes every time. Keep these tips in mind for your next resin project. Success is in the details.