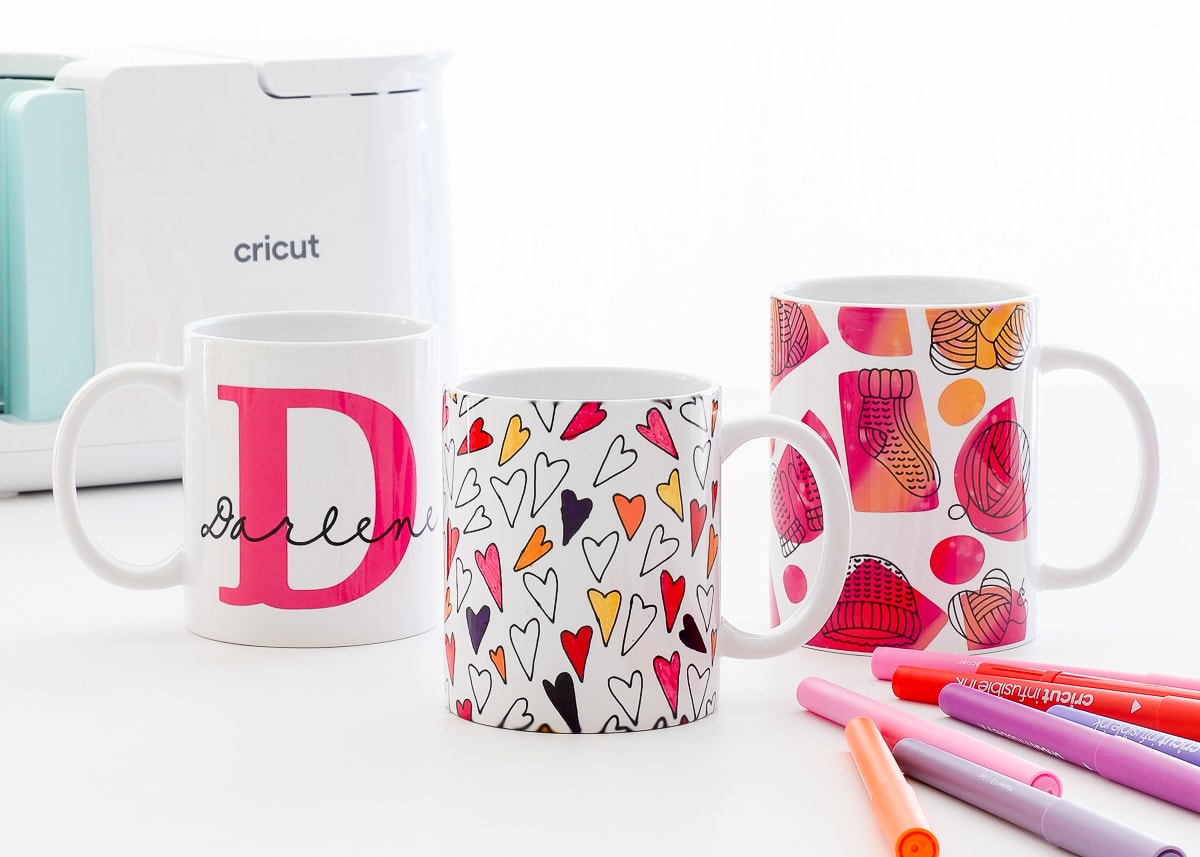
Are you ready to create custom mugs that truly stand out? Making mugs with Cricut and Infusible Ink is easier than you think, and the results look professional and last a long time.
Imagine sipping your morning coffee from a mug designed by you, or gifting personalized mugs that everyone will love. In this guide, you’ll discover simple steps and insider tips to turn plain mugs into your own unique masterpieces. Keep reading, and you’ll be crafting like a pro in no time!
Materials Needed
Making mugs with Cricut and Infusible Ink needs specific materials. Each item plays a key role in the process. Having the right supplies ensures your project turns out great.
Below are the main materials you need to prepare before starting your mug design.
Cricut Machine
The Cricut machine cuts your design precisely on the Infusible Ink sheets. Choose a Cricut Explore or Maker model for best results. The machine works with software to create detailed shapes and letters. It is simple to use, even for beginners.
Infusible Ink Sheets
Infusible Ink sheets provide vibrant and lasting colors. They come in many colors and patterns. These sheets transfer ink into the mug’s surface, making the design permanent. Make sure to buy sheets compatible with your Cricut machine.
Sublimation Mugs
Sublimation mugs have a special coating to absorb the ink. This coating helps the design bond perfectly to the mug. Use only mugs labeled for sublimation or Infusible Ink projects. Normal mugs will not hold the ink properly.
Additional Supplies
You need some extra tools for a smooth process. Heat-resistant tape keeps your design in place during transfer. A heat press or Cricut Mug Press applies the right temperature and pressure. Lint rollers remove dust from the mug surface. Use butcher paper to protect your press.
Preparing Your Design
Preparing your design is a key step in making mugs with Cricut and Infusible Ink. The design sets the tone for your final product. Careful planning helps avoid mistakes and ensures a smooth crafting process. Focus on choosing the right design, using Cricut Design Space, and adjusting the size and layout correctly. These steps make your mug look professional and unique.
Choosing The Right Design
Pick a design that fits the mug’s shape and size. Simple images and clear text work best with Infusible Ink. Avoid very thin lines or tiny details. These may not transfer well on the mug surface. Choose bold shapes and thick fonts for a clean look. Consider themes like quotes, patterns, or illustrations that you like.
Using Cricut Design Space
Open Cricut Design Space to start your project. Upload your chosen design or select from the app’s library. Use tools to clean up the image. Remove any background if needed. Convert text to curves to avoid font issues during cutting. Use the mirror function to flip your design. This step is important for Infusible Ink projects on mugs.
Adjusting Size And Layout
Measure your mug’s printable area accurately. Adjust your design size to fit within this space. Keep some margin so the design does not wrap awkwardly. Align your design in the center or side, based on your preference. Check the layout on screen multiple times. A well-sized and placed design looks balanced and neat on the mug.
Cutting Infusible Ink
Cutting Infusible Ink correctly is key to making beautiful mugs with your Cricut. This step ensures your designs transfer smoothly and look sharp. Pay attention to how you set up and handle the ink sheets. Precision at this stage saves time later and improves your final mug design.
Setting Up The Cricut Machine
Start by turning on your Cricut machine and connecting it to your computer or mobile device. Open the Cricut Design Space app. Select your design and prepare it for cutting. Choose the correct material setting for Infusible Ink sheets. This ensures the blade cuts just right, not too deep or too shallow.
Loading Infusible Ink Sheets
Place the Infusible Ink sheet face down on your cutting mat. Make sure it sticks well and lies flat without wrinkles. Load the mat into the Cricut machine. The machine will detect the mat and material type. This step prevents miscuts and protects your ink sheets from damage.
Cutting Tips And Tricks
Use a sharp blade designed for Infusible Ink. Replace dull blades often. Mirror your design before cutting, especially for text. This is crucial because the design transfers in reverse. After cutting, remove the excess ink carefully. Avoid touching the ink side to keep it clean and ready for transfer.

Weeding The Design
Weeding the design is an important step in making mugs with Cricut and Infusible Ink. It means removing the parts of the ink sheet that you do not need. This helps create a clean and clear image for your mug. Take your time to carefully remove the extra ink. Small mistakes can affect the final look of your mug.
Removing Excess Ink
Start by peeling away the larger pieces of ink that are not part of your design. Use a weeding tool or tweezers to lift the edges gently. Pull slowly to avoid tearing the ink. Place the removed pieces aside safely to avoid mixing them back.
Handling Small Details
Small details need extra care. Use a fine-point weeding tool to pick out tiny parts of the design. Work under good light to see all the small cuts clearly. Take breaks if your hands get tired. Precision here makes your design sharp and neat.
Preparing For Transfer
After weeding, check your design for any leftover bits. Make sure all unwanted ink is removed. Keep your design flat and clean. Place it on a smooth surface ready for transfer to the mug. This step ensures the ink will transfer evenly and look professional.
Applying The Design To The Mug
Applying the design to the mug is a key step in creating a beautiful, lasting mug with Cricut and Infusible Ink. This process requires care and patience. Each step helps ensure the design sticks well and looks perfect after heating.
Cleaning The Mug Surface
Start by cleaning the mug surface thoroughly. Use rubbing alcohol and a lint-free cloth. This removes oils and dust that stop the ink from sticking. Avoid touching the cleaned area with your fingers afterward. A clean surface helps the design transfer smoothly and last longer.
Positioning The Infusible Ink
Next, place the Infusible Ink design on the mug. Align it carefully to get the best look. Use heat-resistant tape to hold the design in place. Make sure the design lies flat and smooth without wrinkles or bubbles. Proper positioning is important for a clear, sharp image.
Securing The Design
Secure the design firmly before heating. Use strong heat-resistant tape around all edges. This prevents the design from moving during the heat process. Check that the tape does not cover the design itself. Securing the design well ensures even heat transfer and vibrant colors.
Heat Press Process
The heat press process is key to making mugs with Cricut and Infusible Ink. It transfers your design onto the mug’s surface. Proper heat and pressure bring the colors to life and make the design permanent.
This step requires careful attention to temperature, time, and safety. Using the right tools and settings ensures a smooth transfer. Follow each part closely to get great results.
Setting Temperature And Time
Set the heat press to 400°F (204°C). This temperature works well for most Infusible Ink projects. The heating time should be about 6 minutes. Too hot or too long can damage the mug or design.
Keep the pressure medium to firm. Not too hard, not too soft. This balance helps the ink transfer evenly. Use a timer to avoid guesswork.
Using A Mug Press Or Oven
A mug press is the best tool for heat pressing mugs. It fits the mug shape and applies even heat. Place the mug in the press carefully and close it firmly.
Some crafters use an oven instead. Wrap the mug with heat-resistant tape and place it on a heat-safe tray. Heat the oven to 400°F and bake for 6 minutes. Use oven mitts to handle the hot mug.
Safety Tips
Always wear heat-resistant gloves to protect your hands. Hot mugs and presses can cause burns. Work in a well-ventilated area to avoid fumes.
Keep children and pets away during the process. Do not touch the heated parts directly. Let the mug cool completely before removing tape or handling.
Finishing Touches
Finishing touches make your mug project look complete and polished. These final steps protect your design and ensure it lasts. Careful handling during this phase keeps your mug looking great.
Follow these steps to finish your mug with care and attention.
Cooling The Mug
Let the mug cool down naturally. Avoid touching the hot surface to prevent smudging. Cooling helps the ink set properly for a long-lasting design. Place the mug on a heat-safe surface. Wait at least 15 minutes before handling.
Removing Transfer Materials
Peel off the transfer sheet slowly and gently. Pull it back at a 45-degree angle for best results. Removing the sheet too fast can lift the ink. Make sure the mug is cool before peeling. This step reveals your design clearly.
Inspecting The Design
Check the mug for any spots or flaws. Look closely at edges and corners of the design. Make sure the ink transferred evenly and completely. Small imperfections can be fixed with touch-up markers. Your mug should look smooth and sharp.
Care Instructions
Proper care is key to keep your Cricut and Infusible Ink mugs looking fresh. These mugs are special because the design melts into the surface. This means the design will not peel or crack easily. Still, you need to treat them right to keep their beauty. Follow these simple care instructions for best results.
Cleaning Tips
Hand wash your mug gently with warm water and mild soap. Avoid scrubbing hard on the design area. Use a soft sponge or cloth to clean. Never put your mug in the dishwasher. The high heat and strong detergents can damage the ink. Let the mug air dry or dry with a soft towel.
Avoiding Damage
Do not use abrasive cleaners or scrubbers on the mug. Avoid soaking the mug in water for a long time. Keep the mug away from sharp objects that can scratch it. Do not microwave the mug as heat can affect the design. Handle the mug carefully to prevent chips or cracks.
Longevity Of The Design
The design lasts longer with gentle use and proper care. Avoid exposing the mug to extreme temperatures. Store the mug in a safe place when not in use. Follow cleaning tips to keep the design vibrant. Taking care of your mug keeps it beautiful for years.
Troubleshooting Common Issues
Making mugs with Cricut and Infusible Ink is fun but can have some hiccups. Small problems can affect your mug’s look and quality. Knowing how to fix common issues saves time and materials. Here are some common problems and easy ways to solve them.
Design Smudging
Design smudging happens when the ink spreads or blurs. It usually occurs if the transfer sheet moves during pressing. Make sure to tape the design firmly on the mug. Use strong heat-resistant tape to hold it in place. Press the mug gently but firmly with the Cricut EasyPress. Avoid lifting the mug too soon after heating. Let it cool before touching to keep the design sharp.
Incomplete Transfers
Incomplete transfers leave parts of the design missing. This issue can happen if heat or pressure is uneven. Check that the mug surface is clean and dry before pressing. Apply even pressure across the entire design area. Set the correct temperature and time on the EasyPress. Using a lint roller on the mug surface helps remove dust and oils. These steps ensure the ink fully transfers onto the mug.
Ink Peeling
Ink peeling happens when the design lifts or flakes off the mug. This usually means the ink did not bond well with the surface. Make sure to use the right type of mug made for Infusible Ink. Avoid touching the mug with oily or wet hands after pressing. Let the mug cool completely before handling. Press the design at the correct temperature and time to secure the ink. Proper care helps keep your design lasting longer.

Frequently Asked Questions
What Materials Do I Need To Make Mugs With Cricut?
You need a Cricut machine, Infusible Ink sheets, blank sublimation mugs, a heat press, and butcher paper. These materials ensure precise design transfer and vibrant, long-lasting colors on your mugs.
How Do I Prepare Infusible Ink For Mug Making?
Cut your Infusible Ink design using Cricut, then weed the excess material carefully. Mirror your design before cutting to ensure proper alignment on the mug.
Can I Use Regular Mugs With Infusible Ink?
No, only sublimation-compatible mugs with a polymer coating work with Infusible Ink. Regular mugs lack this coating and won’t properly absorb the ink for permanent designs.
What Is The Best Heat Press Setting For Infusible Ink Mugs?
Set your heat press to 400°F and press for 6 minutes with medium pressure. These settings ensure optimal ink transfer and vibrant, durable designs on your mugs.
Conclusion
Creating mugs with Cricut and Infusible Ink is fun and simple. You just need a few tools and some patience. Each mug can show your unique style and creativity. Practice helps you get better and try new designs. Enjoy the process and share your beautiful mugs with friends.
This craft brings joy and a sense of pride. Keep experimenting and have fun making your own special mugs.