Ready to add a magical, personal touch to your holiday decorations this year? If you’ve ever wanted to create stunning Christmas ornaments or gifts that truly stand out, resin crafts are the perfect choice for you.
In this easy-to-follow Resin Crafts Tutorial Christmas edition, you’ll discover simple techniques to make beautiful, festive pieces that sparkle and shine. Whether you’re a beginner or looking to try something new, this guide will help you turn ordinary materials into extraordinary holiday treasures.
Get ready to impress your friends and family with handmade resin creations that capture the joy and warmth of the season! Keep reading, and let’s bring your Christmas craft ideas to life.
Materials And Tools
Starting resin crafts for Christmas requires the right materials and tools. These basics ensure your projects turn out beautiful and last long. Clear guidance on what to use helps avoid common mistakes. Below are key points to prepare your workspace effectively.
Choosing The Right Resin
Select resin made for crafting, not industrial use. Epoxy resin is popular for Christmas crafts. It cures clear and has a smooth finish. UV resin cures quickly with a UV light, perfect for small ornaments. Check curing time and safety instructions before buying. Use non-toxic resin for indoor projects to keep air safe.
Essential Crafting Tools
Gather tools before starting to save time. Mixing cups and stir sticks are needed to combine resin and hardener. Gloves protect your hands from sticky resin. A heat gun or torch removes bubbles from poured resin. Use a digital scale for accurate measuring. A silicone mat helps keep your work area clean.
Selecting Molds And Additives
Choose silicone molds for easy resin removal. Christmas shapes like trees, stars, and snowflakes add festive charm. Additives like glitter, mica powder, or dried flowers create unique effects. Use pigments to color resin for vibrant designs. Small charms or beads can embed inside for extra detail.
Basic Resin Techniques
Starting with basic resin techniques is essential for creating beautiful Christmas crafts. Resin is versatile but requires careful handling to achieve the best results. Understanding mixing, eliminating bubbles, and adding colors helps in crafting stunning decorations.
Mixing And Measuring Resin
Mix resin and hardener in the correct ratio. Use a digital scale for accuracy. Stir slowly to avoid introducing air bubbles. Mix for at least two to three minutes until clear. Proper mixing ensures the resin cures hard and smooth.
Eliminating Bubbles
Bubbles can ruin the look of your resin craft. Use a heat gun or a small torch to gently pass over the resin surface. This causes bubbles to pop quickly. Work in a warm room to reduce bubble formation. Avoid shaking the resin container before use.
Adding Colors And Glitter
Add pigments, alcohol inks, or mica powders to resin for vibrant colors. Stir gently to blend evenly without creating bubbles. Sprinkle glitter for festive sparkle and shine. Use small amounts at first to control the effect. Layer colors for a beautiful, unique look.
Resin Christmas Ornaments
Resin Christmas ornaments bring a magical touch to holiday decor. They offer endless creative options for unique, handmade decorations. Crafting these ornaments can be simple and fun, even for beginners.
With resin, you can capture colors, sparkles, and textures in beautiful shapes. These ornaments last for years and add a personal flair to your Christmas tree. Explore different techniques to make your resin creations stand out.
Poured Resin Ornament Ideas
Pouring resin allows you to create smooth, glossy ornaments with custom designs. Use silicone molds shaped like stars, snowflakes, or balls. Mix clear resin with pigments or glitters before pouring.
Layer colors or embed small items like dried flowers or beads for depth. Let each layer cure before adding the next. This method gives stunning, multi-dimensional effects.
Using Uv Resin For Quick Projects
UV resin cures fast under a UV light, perfect for last-minute crafts. It requires less mixing and has less odor than epoxy resin. Use it to coat small charms or add details to your ornaments.
UV resin works well for thin layers or small molds. Simply apply, cure with UV light, and repeat for multiple layers. This method saves time and keeps your workspace clean.
Incorporating Foil And Mica Powders
Foil and mica powders add shimmer and shine to resin ornaments. Mix powders into the resin before pouring or sprinkle on a wet surface. These materials reflect light and create eye-catching effects.
Use gold or silver foil for a classic holiday look. Colored mica powders bring a festive sparkle. Experiment with combinations for unique textures and finishes.
Diy Resin Holiday Decorations
DIY resin holiday decorations bring a personal touch to Christmas decor. Resin crafts let you create unique, lasting pieces with vibrant colors and shapes. These projects are perfect for beginners and add charm to your home during the festive season.
Using resin, you can craft beautiful items that capture holiday spirit. The process is simple and fun, making it ideal for family activities or gifts. Explore creative ideas below to start your resin holiday projects.
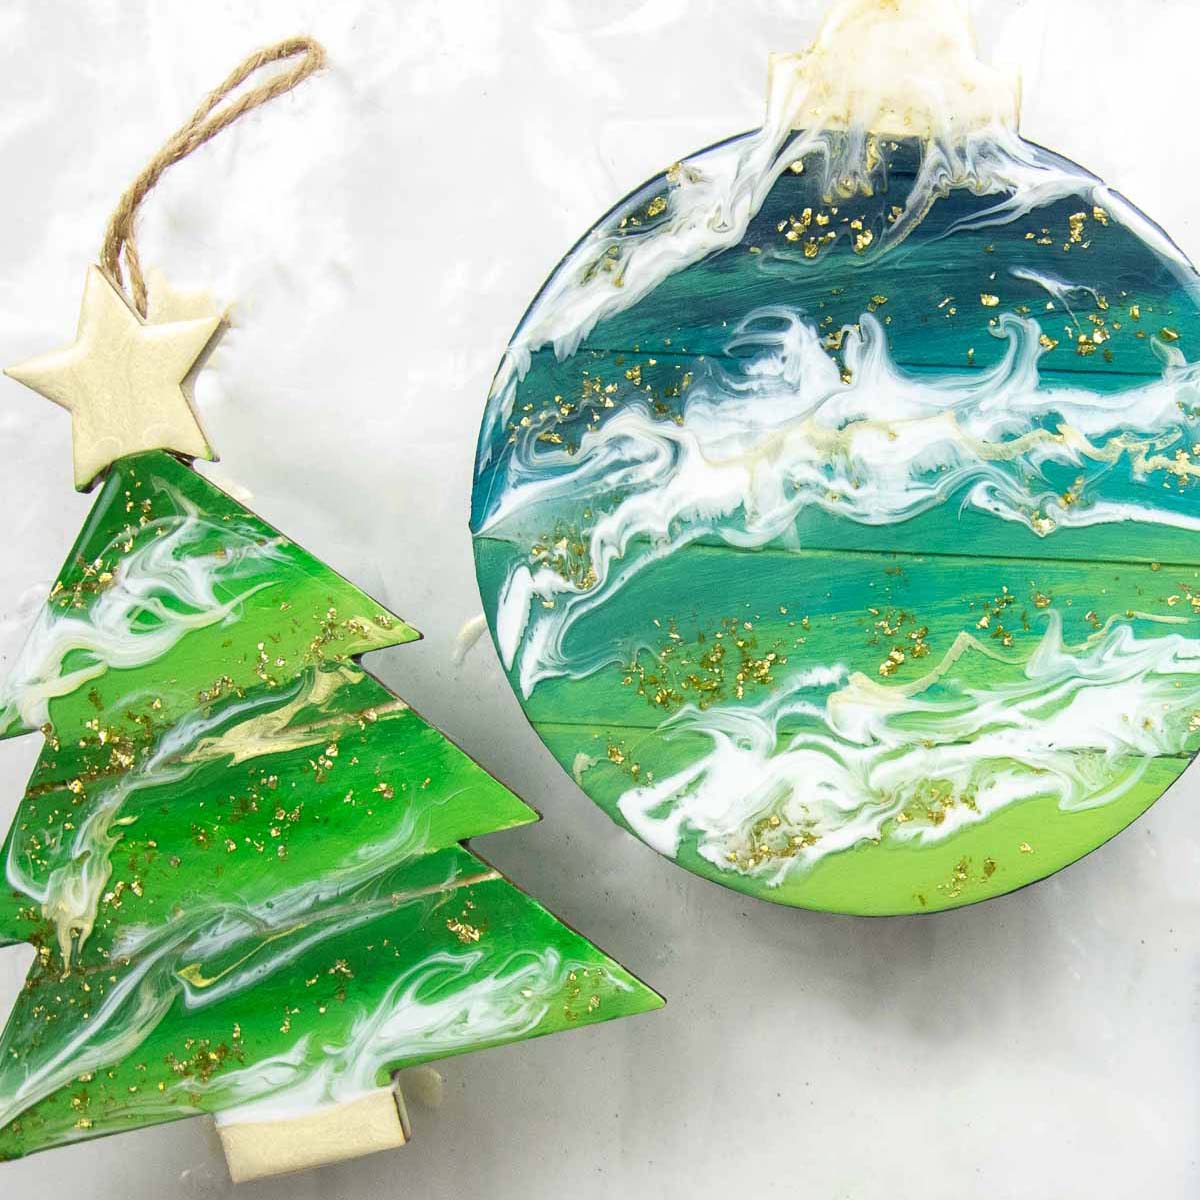
Creating Resin Christmas Trees
Make small resin Christmas trees using silicone molds. Choose green resin or mix colors for a snowy effect. Add glitter or tiny beads for decoration. Pour resin in layers to create depth and texture. Once cured, paint or add details with markers. These trees work well as ornaments or table decor.
Making Decorative Trays
Create festive trays with resin and wooden or plastic bases. Mix resin with holiday-themed colors like red, gold, or silver. Embed small decorations like pine needles, dried flowers, or confetti. Pour resin evenly over the base and let it cure fully. Use trays to hold candles, treats, or keys during the holidays.
Designing Resin Candle Holders
Design resin candle holders for a warm holiday glow. Use molds shaped like stars, snowflakes, or simple cylinders. Add glitter or small charms inside the resin before it sets. Ensure the holder is heat-resistant by using the right resin type. These holders add a cozy feel to any room during Christmas.
Advanced Techniques
Advanced resin techniques enhance your Christmas crafts with depth and detail. These methods create stunning effects impossible with basic resin pours. You can add layers, embed festive items, and use special molds for unique shapes.
Mastering these skills will improve your resin projects and make your Christmas decorations stand out. Let’s explore some key advanced techniques you can try.
Layering And Embedding Objects
Layering resin allows you to build up your design step-by-step. Pour a thin resin layer first and let it partially cure. Add small Christmas objects like glitter, dried flowers, or mini ornaments. Pour another resin layer over them to trap the items inside.
This technique adds dimension and interest to your pieces. Embedding creates a 3D effect that looks magical in holiday decorations. Be sure to cure each layer properly to avoid mixing or cloudiness.
Using Pyramid And Silicone Molds
Pyramid molds give your resin crafts a modern, geometric shape. They catch light beautifully and make elegant ornaments or gift accents. Silicone molds are flexible and easy to use for detailed shapes.
Choose silicone molds designed for resin to avoid sticking issues. Pour resin slowly to reduce bubbles. You can add color or glitter inside the molds for festive effects. Demolding is smooth and keeps your piece intact.
Achieving Elegant Finishes
Elegant finishes bring polish and shine to your resin crafts. Sand rough edges gently with fine-grit sandpaper. Buff the surface with a soft cloth to add smoothness. Use a resin gloss spray or a thin resin topcoat for a clear shine.
Matte finishes are also popular and offer a soft, frosted look. Apply matte spray carefully for even coverage. These finishing touches help your Christmas resin pieces look professional and gift-ready.
Troubleshooting Tips
Troubleshooting is key to crafting beautiful resin Christmas decorations. Mistakes can happen, but many problems have simple fixes. Learning these tips helps create smooth, clear, and shiny resin crafts. Avoid frustration and enjoy the process more with these easy solutions.
Avoiding Resin Stickiness
Sticky resin means it did not cure properly. Check the mixing ratio of resin and hardener. Mix slowly to avoid bubbles and ensure even blending. Work in a warm room, around 70°F (21°C), for best curing. Use a heat gun or torch to remove surface bubbles before curing. Cover your project to protect it from dust and air moisture.
Handling Resin That Won’t Cure
Resin that stays soft or tacky needs attention. Check the expiration date of your resin and hardener. Old or expired resin may never fully harden. Measure ingredients carefully; too much or too little hardener causes curing problems. Stir the mixture for at least 3-5 minutes to activate the chemical reaction. Avoid mixing resin too fast, which creates bubbles and weak spots.
Preventing Cracks And Yellowing
Cracks appear when resin cures too fast or cools quickly. Work in a stable temperature room without drafts. Avoid pouring thick layers at once; pour thin layers and let each cure. Yellowing happens from UV exposure or poor-quality resin. Use UV-resistant resin to keep colors bright and clear. Store finished pieces away from direct sunlight for longer life.
Safety And Cleanup
Working with resin for Christmas crafts is fun but requires care. Safety and cleanup protect your health and workspace. Resin contains chemicals that can irritate skin and lungs. Proper handling helps avoid accidents and keeps your area tidy.
Protective Gear Recommendations
Wear gloves made of nitrile to protect your skin. Use safety goggles to shield your eyes from splashes. A mask with a respirator filter blocks harmful fumes. Dress in old clothes or an apron to avoid stains. Work in a well-ventilated room or near an open window.
Safe Resin Disposal
Do not pour leftover resin down the drain. Harden unused resin by mixing it with a curing agent. Once fully cured, dispose of it with regular trash. Collect resin waste in a sealed container to prevent spills. Follow local regulations for hazardous waste disposal.
Cleaning Tools And Workspaces
Clean brushes and tools immediately after use with rubbing alcohol. Use paper towels to wipe resin spills quickly before hardening. Avoid water on uncured resin as it can cause cloudiness. Cover your workspace with disposable paper or plastic sheets. Dispose of cleaning materials safely to prevent contamination.
Inspiration And Ideas
Resin crafts bring a fresh, creative touch to Christmas projects. They allow you to make stunning decorations and gifts that stand out. This section shares inspiration and ideas to spark your creativity. Explore unique gifts, ways to mix resin with other crafts, and tips to personalize your holiday items.
Unique Resin Gift Ideas
Create one-of-a-kind gifts with resin this Christmas. Try making custom coasters with embedded glitter or dried flowers. Small resin trays with holiday colors make lovely presents. Consider crafting keychains or jewelry with festive shapes. These gifts feel special because they are handmade and unique.
Combining Resin With Other Crafts
Mix resin with wood, fabric, or paper for exciting effects. Pour resin over wooden ornaments to add shine and depth. Use resin to seal paper cutouts or photos inside clear pendants. Combine resin with paint to create colorful holiday art. Blending crafts makes your projects more interesting and rich.
Personalizing Your Decorations
Add names, dates, or messages to resin decorations for a personal touch. Use letter stamps or paint pens before the resin cures. Embed small objects like beads, buttons, or charms that hold meaning. Personal touches make your Christmas crafts memorable keepsakes for family and friends.

Frequently Asked Questions
What Should You Not Put In Resin?
Do not put food, silicone, polyethylene, polypropylene, or Teflon in resin. These materials prevent proper curing and adhesion. Avoid organic matter like leaves or flowers without sealing, as they cause discoloration or decay inside resin.
What Is The Best Beginner Resin Project?
The best beginner resin project is making coasters. Use silicone molds, add alcohol inks or glitter for a simple, personalized design.
What Is The Difference Between Epoxy Resin And Craft Resin?
Epoxy resin suits large, durable crafts needing a deep finish and long curing time. Craft resin, often UV resin, cures quickly under UV light, ideal for small projects like jewelry without mixing. Choose based on project size, finish, and curing speed.
What Resin Craft Sells The Most?
The best-selling resin crafts are coasters, jewelry, and Christmas ornaments. These items attract buyers due to their uniqueness and customization options.
Conclusion
Resin crafts bring a special touch to Christmas decorations. They allow creativity and personal style to shine. Simple steps make crafting easy and fun for everyone. Handmade resin pieces add charm to holiday gifts and homes. Try different colors and shapes to create unique ornaments.
Enjoy the process and watch your festive ideas come alive. Resin crafts can brighten your Christmas season beautifully. Keep experimenting and sharing your beautiful resin creations with loved ones.