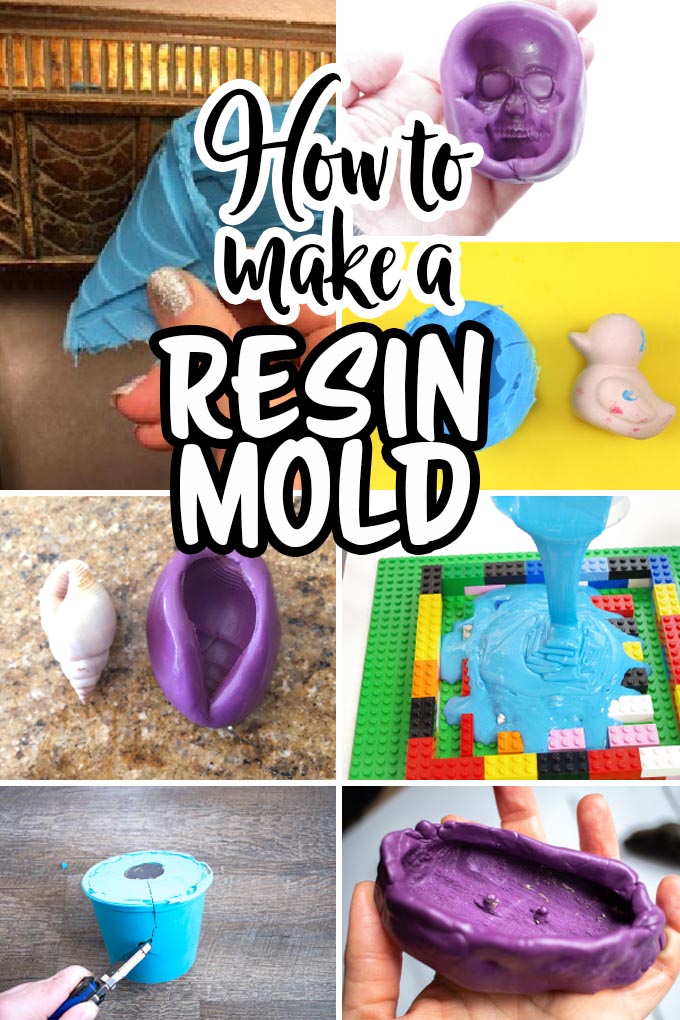
Are you ready to unlock the secrets of resin crafts and create your own unique mold masterpieces? Making your own molds is the key to bringing your creative ideas to life with resin.
Whether you want to craft custom jewelry, decorative pieces, or one-of-a-kind gifts, mastering mold making puts the power in your hands. This tutorial will guide you step-by-step through simple, clear instructions so you can confidently make silicone molds that fit your vision perfectly.
By the end, you’ll know exactly how to turn everyday objects into reusable molds and make stunning resin art that stands out. Keep reading to transform your resin projects and impress everyone with your new skills!

Resin Mold Basics
Resin mold making is a key step in resin crafts. It shapes the final piece and influences its details. Understanding the basics of resin molds helps you create better projects. It also saves time and materials. This section covers the essential points about resin molds and how to start making them.
Types Of Molds For Resin
There are several mold types for resin crafting. Silicone molds are flexible and easy to use. They release resin easily without damage. Plastic molds are rigid and cheaper but harder to remove resin from. Metal molds are durable and good for simple shapes. Each mold type fits different project needs.
Materials Needed For Mold Making
Making resin molds requires some basic materials. Silicone rubber is common for mold making due to its flexibility. Mold boxes or containers hold the silicone during curing. Mixing tools help blend silicone and catalyst evenly. Measuring cups ensure the right silicone ratio. A release agent may be needed for some molds.
Choosing The Right Mold Material
Choosing the right mold material depends on your project. Silicone is ideal for detailed and flexible molds. It works well with most resin types. Plastic molds suit simple shapes and quick projects. Consider the mold’s durability and ease of use. Also, check if the mold material reacts with your resin.
Preparing For Mold Making
Preparing for mold making is a crucial step in resin crafts. It sets the stage for creating detailed and durable molds. A well-prepared original object and workspace ensure smooth casting and fewer mistakes. This section covers how to choose objects, clean and seal them, and set up a safe workspace.
Selecting Objects For Molding
Choose objects with clear details and smooth surfaces. Avoid items that are too porous or fragile. Small, simple shapes work best for beginners. Avoid organic materials that can decay or release moisture. Plastic, metal, and resin originals usually mold well. Keep in mind the size of your mold box to fit your object comfortably.
Cleaning And Sealing Originals
Clean your object thoroughly to remove dust and oils. Use soap and water or rubbing alcohol for cleaning. Let the object dry completely before sealing. Seal porous materials like wood or paper with a thin layer of varnish or glue. This prevents resin from sticking or soaking into the original. Proper sealing also helps preserve the object for future use.
Workspace Setup And Safety Tips
Work in a well-ventilated area to avoid fumes. Cover surfaces with plastic or paper to catch spills. Keep your tools and materials organized for easy access. Wear gloves and a mask to protect your skin and lungs. Avoid eating or drinking near your workspace. Have a fire extinguisher nearby as a safety precaution. Good lighting helps you see details and avoid errors.
Step-by-step Mold Making
Creating your own molds is a key skill in resin crafts. Step-by-step mold making helps you capture shapes perfectly. This guide breaks down the process into clear, simple parts. Follow these steps to make durable silicone molds for resin projects. Each phase is important to get the best results and avoid common mistakes.
Mixing Silicone For Mold
Start by measuring equal parts of silicone base and catalyst. Use a clean container for mixing. Stir slowly and thoroughly for about three to five minutes. Avoid whipping air into the silicone. Air bubbles cause flaws in the final mold. Mix until the color is even and consistent. Always follow the manufacturer’s instructions for the best cure time.
Pouring And Curing Process
Pour the mixed silicone over your model slowly. Begin from one corner and let silicone flow naturally. This reduces trapped air and bubbles. Fill the mold box completely to cover the model. Leave space on top for extra silicone. Let the silicone cure at room temperature. Curing time usually ranges from several hours to overnight. Do not rush this step as it affects mold quality.
Demolding Techniques
Carefully remove the mold from the mold box. Gently peel the silicone away from the model. Avoid using sharp tools that can damage the mold. Flex the mold slowly to release the object inside. If the mold sticks, use a soft brush to ease edges. Inspect the mold for any defects or air pockets. A clean, well-made mold ensures smooth resin casting later.
Common Mold Making Mistakes
Mold making is a key step in resin crafts. Mistakes here can ruin your final piece. Knowing common errors helps improve your results. Many crafters face similar challenges. Fixing these early saves time and materials.
Avoiding Air Bubbles
Air bubbles often appear inside molds. They create holes and uneven surfaces. To reduce bubbles, mix silicone slowly. Stir gently without whipping air in. Tap the mold container lightly to release trapped air. Use a vacuum chamber if possible. Pour silicone in a thin stream. This helps push bubbles out before curing.
Preventing Mold Tear
Mold tear happens when silicone rips during demolding. Thin areas or sharp edges cause this. Use enough silicone thickness for strength. Avoid very thin or weak spots. Add a mold release agent to ease removal. Pull molds gently and evenly. Store molds in a cool, dry place to keep them flexible.
Handling Silicone Shrinkage
Silicone shrinks slightly as it cures. This can change mold size or detail. Measure silicone and mixing ratio carefully. Follow product instructions exactly. Use high-quality silicone designed for molds. Allow full curing time before use. Shrinkage is small but affects precise designs. Planning for it ensures better accuracy in your crafts.
Casting Resin Into Molds
Casting resin into molds is a key step in resin crafts. It transforms liquid resin into beautiful shapes. This process needs careful attention for best results. Understanding each step helps avoid common mistakes and creates lasting pieces.
Choosing The Right Resin
Select resin based on your project needs. Epoxy resin is clear and strong, good for jewelry and art. Polyurethane resin cures fast but can yellow over time. UV resin hardens quickly under light, ideal for small items. Check resin’s cure time and finish before buying.
Preparing Resin For Pouring
Mix resin and hardener in correct ratios. Stir slowly to avoid bubbles. Use a clean container and a stir stick. Pour resin in thin layers for large molds. Remove bubbles with a heat gun or torch carefully. Work in a dust-free area to keep surface smooth.
Demolding Resin Creations
Wait until resin is fully cured before removing it. Flex the mold gently to loosen edges. Push from the back to release the piece. Use a mold release spray next time to ease removal. Handle resin pieces with care to avoid cracks or scratches.
Enhancing Resin Projects
Enhancing resin projects takes your craft to a new level. Small details make a big impact. Using colors, special items, and proper techniques creates unique pieces. Every step shapes the final look and feel of your resin art. These tips help you improve your mold making and resin casting skills.
Adding Colors And Inclusions
Color gives life to resin crafts. Use liquid dyes, powders, or mica pigments for vibrant effects. Mix colors carefully for smooth blends or sharp contrasts. Inclusions like dried flowers, glitter, or small charms add interest. Place them thoughtfully inside the mold before pouring resin. These elements create depth and make your project stand out.
Using Release Agents
Release agents prevent resin from sticking to molds. Apply a thin layer before pouring resin. This step saves time and protects your mold’s shape. Choose a release spray or silicone-based agent suitable for your mold material. Proper use ensures easy removal and keeps molds reusable. It also helps avoid damaging delicate details in your design.
Finishing And Polishing Tips
Finishing touches give resin pieces a polished look. Sand rough edges gently with fine-grit sandpaper. Use a polishing compound to bring out shine. Buffing with a soft cloth enhances smoothness and clarity. Clear resin pieces benefit from a UV-resistant spray to prevent yellowing. Careful finishing boosts the quality and durability of your creations.
Troubleshooting Mold Issues
Troubleshooting mold issues is a key step in resin crafting. Molds can develop problems that affect your project’s quality. Knowing how to fix common issues saves time and materials. This section covers how to handle sticking resin, fix mold imperfections, and extend mold life.
Dealing With Resin Sticking
Resin sticking to the mold ruins the shape and wastes resin. Use a mold release spray before pouring resin. Let the spray dry fully for best results. Clean the mold with warm soapy water after each use. Avoid using sharp tools to remove resin; they can damage the mold. Gently flex the mold to release cured resin. Silicone molds usually prevent sticking if used correctly.
Fixing Mold Imperfections
Small bubbles or dents in your mold affect resin’s finish. Fill these imperfections with clear silicone or mold putty. Smooth the repair with a spatula or your finger. Let the fix cure completely before using the mold again. Inspect molds carefully before pouring resin. Avoid trapping air bubbles by pouring resin slowly and steadily. Use a heat gun or torch to pop bubbles on resin surface.
Extending Mold Lifespan
Proper care keeps molds flexible and usable for many projects. Store molds away from direct sunlight and heat. Clean molds immediately after use to prevent resin buildup. Avoid harsh chemicals; mild soap and water work best. Do not bend molds sharply as this causes tears. Use separate molds for different resin colors to avoid stains. Rotate molds regularly to evenly distribute wear and tear.
Creative Resin Mold Ideas
Creative resin mold ideas open up endless possibilities for craft lovers. Resin molds allow making unique shapes and designs easily. They help bring your artistic visions to life with vibrant colors and textures.
Using molds, you can create many resin projects. These range from small jewelry to large home decor pieces. Each mold adds a personal touch to your craftwork. Experimenting with different molds keeps the process fresh and fun.
Jewelry And Accessories
Resin molds are perfect for making beautiful jewelry. You can cast earrings, pendants, and rings in various shapes. Use flower petals, glitter, or tiny beads inside the resin for detail. Clear resin highlights the embedded items well.
Try geometric shapes or nature-inspired designs for trendy accessories. Small silicone molds work best for these projects. Handmade resin jewelry makes great gifts and sells well at craft fairs.
Home Decor Pieces
Resin molds help create stylish home decor items. Think coasters, trays, or decorative bowls. Adding metallic powders or dried flowers makes each piece unique. Large molds let you make statement art pieces too.
Mix colors to match your room’s theme. The smooth finish of resin adds elegance to any decor. These resin crafts are durable and easy to clean, perfect for everyday use.
Seasonal And Themed Projects
Seasonal molds bring festive charm to your resin crafts. Create holiday ornaments, Halloween decorations, or spring-themed charms. Themed molds like stars, pumpkins, or hearts suit special occasions.
Change colors and inclusions to fit the event. These projects are fun for parties or gifts. Resin molds let you capture the spirit of each season beautifully.
Sourcing Supplies Locally
Sourcing supplies locally for resin crafts mold making saves time and helps you find quality materials. Buying from nearby stores supports local businesses and allows hands-on inspection of products. It also reduces shipping costs and delivery wait times. Many craft stores in Austin, Texas, offer a wide range of mold making supplies. Explore local options before deciding where to shop.
Where To Buy In Austin, Texas
Austin has several craft and art supply stores for resin mold making. Michaels and Hobby Lobby carry silicone molds and casting materials. Local art supply shops often stock unique items and helpful staff. Hardware stores may offer tools and mixing containers needed for molds. Check out smaller craft boutiques for specialty silicone and resin products. Farmers markets and craft fairs sometimes feature local resin suppliers too.
Online Vs. In-store Options
Online shopping offers a huge variety of mold making supplies with customer reviews. You can find specific silicone types and resin brands not sold locally. Shipping may take several days, adding to wait times. In-store shopping allows immediate purchase and product testing. You can ask staff questions and get advice on materials. Combining both methods often works best for resin crafters.
Budget-friendly Material Choices
Look for affordable silicone mold kits in local stores to start your projects. Basic food-grade silicone works well for many mold types. Reusing containers and trays as molds can cut costs. Buy resin in smaller quantities to avoid waste. Discount stores and dollar shops sometimes have useful craft supplies. Compare prices locally and online to find the best deals. Saving money does not mean lowering quality.

Frequently Asked Questions
How To Make Resin Art With Molds Step By Step?
Clean the mold, mix resin and hardener, pour into mold, remove bubbles, cure fully, then demold carefully.
What Should You Not Cast In Resin?
Avoid casting wet organic materials like fresh fruit, vegetables, green wood, or unsealed paper. Resin also won’t bond with silicone, Teflon, polyethylene, polypropylene, or vinyl surfaces. These materials cause curing issues, poor adhesion, or damage your project. Always use dry, sealed, and compatible items for resin casting.
What Will Epoxy Resin Not Stick To?
Epoxy resin will not stick to silicone, Teflon, polyethylene, polypropylene, vinyl, or oily, greasy, and moist surfaces.
How To Start Resin Art As A Beginner?
Start resin art by gathering epoxy resin, molds, gloves, and a well-ventilated workspace. Mix resin carefully, pour into molds, then cure as instructed. Practice with small projects to build skills and creativity.
Conclusion
Crafting your own resin molds brings creativity to life. The process is simple and fun. Use the right materials and follow each step carefully. Patience helps achieve smooth, detailed molds. Experiment with shapes and designs to find your style. Avoid casting wet or oily items to prevent flaws.
Silicone molds work best for easy resin release. Practice makes your skills stronger over time. Enjoy creating unique resin art with your handmade molds. Keep exploring new ideas and techniques for better results. Your resin craft journey just begins here.